Pages

Tuesday, February 28, 2012

How ASP.NET Web Pages are Processed on the Web Server

Introduction


Have you ever wondered, precisely, what happens on the Web server when a request for an ASP.NET Web page comes in? How does the Web server handle the incoming request? How is the HTML that is emitted to the client generated? What mechanisms are possible for us developers to work with an incoming request in its various stages of processing? In this article we'll take a rather detailed look at how ASP.NET Web pages are processed on the Web server.

Step 0: The Browser Makes an HTTP Request for an ASP.NET Web Page


The entire process begins with a Web browser making a request for an ASP.NET Web page. For example, a user might type into their browser's Address window the URL for this article, http://aspnet.4guysfromrolla.com/articles/011404.aspx. The Web browser, then, would make an HTTP request to the 4Guys Web server, asking for the particular file /articles/011404-1.aspx.

Step 1: The Web Server Receives the HTTP Request


The sole task of a Web server is to accept incoming HTTP requests and to return the requested resource in an HTTP response. The 4Guys Web server runs Microsoft's Internet Information Services (IIS) Web server. The first things IIS does when a request comes in is decide how to handle the request. Its decision is based upon the requested file's extension. For example, if the requested file has the .asp extension, IIS will route the request to be handled by asp.dll. The extensions can be mapped through IIS. There are numerous file extensions that map to the ASP.NET engine, some of which include:
  • .aspx, for ASP.NET Web pages,
  • .asmx, for ASP.NET Web services,
  • .config, for ASP.NET configuration files,
  • .ashx, for custom ASP.NET HTTP handlers,
  • .rem, for remoting resources,
  • And others!
In the IIS administration screens, you can configure the extension mappings. The screenshot to the right shows the configuration screen for IIS 5.0. You could, for example, add your own custom extensions here. That is, you could have requests for .scott files routed to the ASP.NET engine.
The diagram below illustrates the steps 0 and 1 of a request for an ASP.NET Web page. When a request comes into the Web server, it is routed to the proper place (perhaps asp.dll for classic ASP page requests, perhaps the ASP.NET engine for ASP.NET requests) based on the requested file's extension.

A diagram illustrating steps 1 and 2.

Step 2: Examining the ASP.NET Engine


An initial request for http://aspnet.4guysfromrolla.com/articles/011404.aspx will reach IIS and then be routed to the ASP.NET engine, but what happens next? The ASP.NET engine is often referred to as the ASP.NET HTTP pipeline, because the incoming request passes through a variable number of HTTP modules on its way to an HTTP handler. HTTP modules are classes that have access to the incoming request. These modules can inspect the incoming request and make decisions that affect the internal flow of the request. After passing through the specified HTTP modules, the request reaches an HTTP handler, whose job it is to generate the output that will be sent back to the requesting browser. The following diagram illustrates the pipeline an ASP.NET request flows through.

A diagram illustrating step 2.
There are a number of pre-built HTTP modules that are included in the HTTP pipeline by default. These modules include:
  • OutputCache, which handles returning and caching the page's HTML output, if needed
  • Session, which loads in the session state based on the user's incoming request and the session method specified in the Web.config file
  • FormsAuthentication, which attempts to authenticate the user based on the forms authentication scheme, if used
  • And others!
In fact, you can see a precise list of what modules are used by default by going to the machine.config file (located in the $WINDOWS$\Microsoft.NET\Framework\$VERSION$\CONFIG directory) and searching for the element.


HTTP handlers are the endpoints in the ASP.NET HTTP pipeline. The job of the HTTP handler is to generate the output for the requested resource. For ASP.NET Web pages, this means rendering the Web controls into HTML and returning this HTML. For a Web service, it would involve executing the specified method and wrapping its return values into an appropriately formatted SOAP response. (For more on Web services, be sure to read: An Extensive Examination of Web Services.)
Different ASP.NET resources use different HTTP handlers. The handlers used by default are spelled out in the machine.config's section. Entries in this section refer to classes that are either HTTP handlers themselves or are HTTP handler factories. An HTTP handler factory merely returns a suitable HTTP handler instance when invoked.


Realize that you can create your own HTTP modules and HTTP handlers, and then plug them into the pipeline for all Web sites on the Web server by modifying machine.config, or you can add them to a particular Web application by modifying that application's Web.config file. A thorough discussion on using HTTP modules and handlers is far beyond the scope of this article, but realize that you can accomplish some neat things using modules and handlers. For example, you can use HTTP modules to provide a custom URL rewritter, which can be useful for automatically fixing 404 errors to using shorter and user-friendlier URLs. (See Rewrite.NET - A URL Rewriting Engine for .NET for an example of using HTTP modules for URL rewriting.) Another cool use of modules is compressing the generated HTML.
For a good discussion on HTTP modules and handlers be sure to read Mansoor Ahmed Siddiqui's article: HTTP Handlers and HTTP Modules in ASP.NET.

Step 3: Generating the Output


The final step is for the suitable HTTP handler to generate the appropriate output. This output, then, is passed back through the HTTP modules and then back to IIS, which then sends it back to the client that initiated the request. (If the client was a Web browser, the Web browser would receive this HTML and display it.) Since the steps for generating the output differ by HTTP handler, let's focus in on one in particular - the HTTP handler that is used to render ASP.NET Web pages. To retrace the initial steps, when a request comes into IIS for an ASP.NET page (i.e., one with a .aspx extension), the request is handed off to the ASP.NET engine. The request then moves through the modules. The request is then routed to the PageHandlerFactory, since in the machine.config's section we have the mapping:

The PageHandlerFactory class is an HTTP handler factory. It's job is to provide an instance of an HTTP handler that can handle the request. What PageHandlerFactory does is find the compiled class that represents the ASP.NET Web page that is being requested.
If you use Visual Studio .NET to create your ASP.NET Web pages you know that the Web pages are composed of two separate files: a .aspx file, which contains just the HTML markup and Web controls, and a .aspx.vb or .aspx.cs file that contains the code-behind class (which contains the server-side code). If you don't use Visual Studio .NET, you likely use a server-side

6 important .NET concepts: - Stack, heap, Value types, reference types, boxing and Unboxing.

Introduction

This article will explain 6 important concepts Stack , heap , value types , reference types , boxing and unboxing. This article starts first explaining what happens internally when you declare a variable and then it moves ahead to explain 2 important concepts stack and heap. Article then talks about reference types and value types and clarifies some of the important fundamentals around them.

Finally the article concludes by demonstrating how performance is hampered due to boxing and unboxing with a sample code.


What goes inside when you declare a variable?

When you declare a variable in a .Net application, it allocates some chunk of memory in to the RAM. This memory has 3 things first the name of the variable, second data type of the variable and finally the value of the variable.

That was a simple explanation of what happens in the memory, but depending on what kind of data type your variable is allocated on that type of memory. There are two types of memory allocation stack memory and heap memory. In the coming sections we will try to understand these two types of memory in more details.


Stack and Heap

In order to understand stack and heap, let’s understand what actually happens in the below code internally.

public void Method1()
{
// Line 1
int i=4;

// Line 2
int y=2;

//Line 3
class1 cls1 = new class1();
}
It’s a 3 line code so let’s understand line by line how things execute internally.

Line 1:- When this line is executed compiler allocates a small amount of memory in to memory type called as stack. Stack is responsible of keeping track of running memory needed in your application.

Line 2:- Now the execution moves to the next step. As the name says stack it stacks this memory allocation on the top of the first memory allocation. You can think about stack as series of compartment or boxes put on top of each other.

Memory allocation and de-allocation is done using LIFO (Last in first out) logic. In other words memory is allocated and de-allocated at only one end of the memory i.e. top of the stack.

Line 3:- In line 3 we have a created an object. When this line is executed it creates a pointer on the stack and the actual object is stored in a different type of memory location called as ‘Heap’. ‘Heap’ does not track running memory it’s just pile of objects which can reached at any moment of time. Heap is used for dynamic memory allocation.

One more important point to note here is reference pointers are allocated on stack. The statement, Class1 cls1; does not allocate memory for an instance of Class1, it only allocates a stack variable cls1 (and sets it to null). The time it hits the new keyword it allocates on "HEAP".

Exiting the method (The fun):- Now finally the execution control starts exiting the method. When it passes the end control it clears all the memory variables which are assigned on stack. In other words all variables which are related to ‘int’ data type are de-allocated in ‘LIFO’ fashion from the stack.

The BIG catch – It did not de-allocate the heap memory. This memory will be later de-allocated by “GARBAGE COLLECTOR”.


Now many of our developer friends must be wondering why two types of memory, can’t we just allocate everything on just one memory type and we are done.

If you look closely primitive data types are not complex, they hold single values like ‘int i = 0’. Object data types are complex, they reference other objects or other primitive data types. In other words they hold reference to other multiple values and each one of them must be stored in memory. Object types need dynamic memory while primitive needs static type memory. If the requirement is of dynamic memory it’s allocated on a heap or else it goes on a stack.


Image taken from http://michaelbungartz.wordpress.com/

Value types and reference types

Now that we have understood the concept of ‘Stack’ and ‘Heap’ it’s time to understand the concept of value types and reference types.

Value types are types which hold both data and the memory on the same location. While a reference type has a pointer which points to the memory location.

Below is a simple integer data type with name ‘i’ whose value is assigned to an other integer data type with name ‘j’. Both these memory values are allocated on the stack.

When we assign the ‘int’ value to the other ‘int’ value it creates a complete different copy. In other word if you change either of them the other does not change. These kinds of data types are called as ‘Value types’.

When we create an object and when we assign one object to the other object, they both point to the same memory location as show in the below code snippet. So when we assign ‘obj’ to ‘obj1’ they both point to the same memory location.

In other words if we change one of them the other object is also affected this is termed as ‘Reference types’.


So which data types are ref type and value type?

In .NET depending on data types the variable is either assigned on the stack or on the heap. ‘String’ and ‘Objects’ are reference types and any other .NET primitive data types are assigned on the stack. Below figure explains the same in a more detail manner.

Boxing and Unboxing

WOW, you have given so much knowledge, so what’s the use of it in actual programming. One of the biggest implications is to understand the performance hit which is incurred due to data moving from stack to heap and vice versa.

Consider the below code snippet. When we move a value type to reference type the data is moved from the stack to the heap. When we move reference type to a value type the data is moved from the heap to the stack.

This movement of data from the heap to stack and vice-versa creates a performance hit.

When the data moves from value types to reference types its termed as ‘Boxing’ and the vice versa is termed as ‘UnBoxing’.

If you compile the above code and see the same in ILDASM you can see in the IL code how ‘boxing’ and ‘unboxing’ looks, below figure demonstrates the same.

Performance implication of Boxing and unboxing

In order to see how the performance is impacted we ran the below two functions 10,000 times. One function has boxing and the other function is simple. We used a stop watch object to monitor the time taken.

The boxing function was executed in 3542 MS while without boxing the code was executed in 2477 MS. In other words try to avoid boxing and unboxing. In project you always need boxing and unboxing , use it when it’s absolutely necessary.

With the same article the sample code is attached which demonstrates this performance implication.

Currently I have not put a source code for unboxing but the same hold true for the same. You can write the same and experiment it by using stopwatch class.

Monday, February 27, 2012

Top 10 Best Practices for Production ASP.NET Applications

1.  Generate new encryption keys

When moving an application to production for the first time it is a good idea to generate new encryption keys.  This includes the machine validation key and decryption key as well as any other custom keys your application may be using.  There is an article on CodeProject that talks about generating machineKeys specifically that should be helpful with this.

2.  Encrypt sensitive sections of your web.config

This includes both the connection string and machine key sections.  See Scott Guthrie's post for some good references.  Note that if your application runs in a clustered environment you will need to share a custom key using the RSA provider as described in an MSDN article.

3.  Use trusted SQL connections

Both Barry Dorrans and Alex Chang have articles which discuss this in detail.

4.  Set retail="true" in your machine.config

    <configuration> <system.web> <deploymentretail="true"/> system.web> configuration> This will kill three birds with one stone.  It will force the 'debug' flag in the web.config to be false,  it will disable page output tracing, and  it will force the custom error page to be shown to remote users rather than the actual exception or error message.  For more information you can read Scott Guthrie's post or the MSDN reference.

5.  Create a new application pool for your site

When setting up your new site for the first time do not share an existing application pool.  Create a new application pool which will be used by only by the new web application.

6.  Set the memory limit for your application pool

When creating the application pool, specifically set the memory limit rather than the time limit which is set by default.  Asp.net has a good whitepaper which explains the value of this:
By default IIS 6.0 does not set a limit on the amount of memory that IIS is allowed to use. ASP.NET’s Cache feature relies on a limitation of memory so the Cache can proactively remove unused items from memory.
It is recommended that you configure the memory recycling feature of IIS 6.0.

7.  Create and appropriately use an app_Offline.htm file

There are many benefits to using this file.  It provides an easy way to take your application offline in a somewhat user friendly way (you can at least have a pretty explanation) while fixing critical issues or pushing a major update.  It also forces an application restart in case you forget to do this for a deployment.  Once again, ScottGu is the best source for more information on this.

8.  Develop a repeatable deployment process and automate it

It is way too easy to make mistakes when deploying any type of software.  This is especially the case with software that uses configuration files that may be different between the development, staging, or production environments.  I would argue that the process you come up with is not nearly as important as it being easily repeatable and automated.  You can fine tune the process as needed, but you don't want a simple typo to bring a site down.

9.  Build and reference release versions of all assemblies

In addition to making sure ASP.NET is not configured in debug mode, also make sure that your assemblies are not debug assemblies.  There are of course exceptions if you are trying to solve a unique issue in your production environment ... but in most cases you should always deploy with release builds for all assemblies.

10.  Load test

This goes without saying.  Inevitably, good load testing will uncover threading and memory issues not otherwise considered.

Encrypt sensitive information in web.config file

Introduction

Certain sections of web.config file can be encrypted using "Protected Configuration" technique. In our current application, we shall be encrypting the database connection string stored in clear text format.

Implementation guidelines: Deployment Phase

  1. The application should be hosted in the local IIS (Production system). In the current case, the application name is TestEncrypt. The application is developed in ASP.NET 2.0.
  2. Create a web.config file and use the Configuration section to specify the connection string. The connection string should be added using a Add section:
    <configuration>
      <appSettings/>
      <connectionStrings>
        <add name="ConnectionString " connectionString="Data Source=127.0.0.1;
            Initial Catalog=TestDatabase;User ID=sa; password=TestPassword"
          providerName="System.Data.SqlClient" /></connectionStrings>
    
  3. To encrypt the "ConnectionStrings" section, use the following command at the command line prompt:
    aspnet_regiis -pe "connectionStrings" -app "/TestEncrypt"
    
  4. Once encryption is successful, the web.config file will look like:
    <configuration>
        <appSettings/>
      <connectionStrings configProtectionProvider=
    "RsaProtectedConfigurationProvider">
        <EncryptedData Type="http://www.w3.org/2001/04/xmlenc#Element"
          xmlns="http://www.w3.org/2001/04/xmlenc#">
          <EncryptionMethod Algorithm="http://www.w3.org/2001/04/
    xmlenc#tripledes-cbc" />
          <KeyInfo xmlns="http://www.w3.org/2000/09/xmldsig#">
            <EncryptedKey xmlns="http://www.w3.org/2001/04/xmlenc#">
              <EncryptionMethod Algorithm="http://www.w3.org/2001/04/
    xmlenc#rsa-1_5" />
              <KeyInfo xmlns="http://www.w3.org/2000/09/xmldsig#">
                <KeyName>Rsa Key</KeyName>
              </KeyInfo>
              <CipherData>
                <CipherValue>I/07jVrRIOKHgUk2jmJJkuIfp</CipherValue>
              </CipherData>
            </EncryptedKey>
          </KeyInfo>
          <CipherData>
            <CipherValue>ClC9khGOCclEFd9MjXOM0FTg</CipherValue>
          </CipherData>
        </EncryptedData>
      </connectionStrings>
    
  5. Provide access to the user account under which ASP.NET is running. By default, on Windows Server 2003 with impersonation for an ASP.NET application disabled in the Web.config file, the identity under which the application runs is the NETWORK SERVICE account. On other versions of Windows, ASP.NET runs under the local ASPNET account (MACHINENAME\ASPNET). Use the following code snippet(in C#) to find out the value of current user account:
    <% Response.Write(System.Security.Principal.
                    WindowsIdentity.GetCurrent().Name); %>
    
  6. At the command prompt, execute the following command to grant permissions to the User Account:
    aspnet_regiis -pa "NetFrameworkConfigurationKey" ""
  7. To edit encrypted values(for future change), decrypt the connectionStrings using the following command line parameter:
    aspnet_regiis -pd "connectionStrings" -app "/testEncrypt"
    
  8. Make the necessary changes to the connection string in clear text and repeat step 3 to encrypt the new values.

References

Note

The same can be done at the development phase by providing an admin utility to encrypt and decrypt the connection string. Refer to the download file at the beginning at the article for the same.

Improve ASP.NET website performance by enabling compression in IIS

GZIP Format is developed by GNU Project and standardized by IETF in RFC 1952, which MUST be considered by web developers to improve their websites’ performance, there are several Quintessential articles documented using gzip compression, they are:
10 Tips for Writing High-Performance Web Applications
Best Practices for Speeding Up Your Web Site
How To Optimize Your Site With GZIP Compression
IIS 7 Compression. Good? Bad? How much?
A gzip compressed HTTP package can significantly save bandwidth thus speed up browser rendering after use hitting enter, and user experience got improved finally, nowadays most of the popular browsers such as IE, Firefox, Chrome, Opera support gzip encoded content (please refer: http://en.wikipedia.org/wiki/HTTP_compression).
PS: the other compression encoding is deflate, “but it’s less effective and less popular” (refer: http://developer.yahoo.com/performance/rules.html).
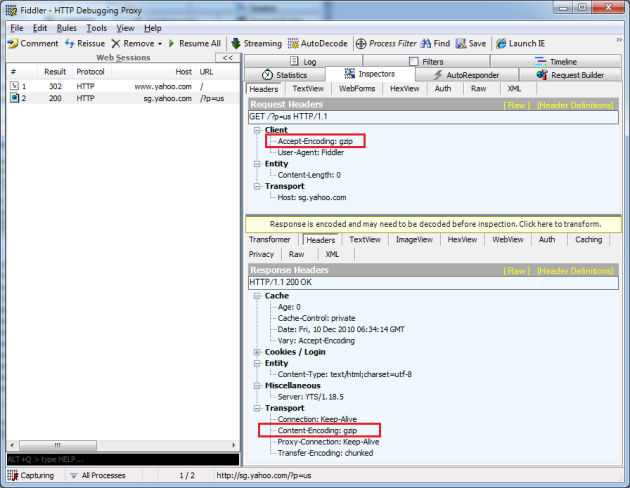
Yahoo uses gzip compression and suggest developers do that:

Compression in IIS

For ASP.NET developer who host website on IIS like me, to achieve this is fairly easy, open IIS manager and select your website, then go to Compression Module. (Apache admins refer here)
IISCompressionModule
Double click and you will see:

IIS supports two kinds of compression:
  • Static Compression
    IIS compress a specific file at first time and only the first time, afterward every time IIS receive request on this file it will return the compressed data.  This is usually used on the files not frequently changing such as a static html file, an rarely changed XML, a Word document or any file doesn’t change frequently.
  • Dynamic Compress
    IIS will do compression EVERY time a client’s request on one specific file, this usually used on some content that often changes, for example, there is a large CSV file generating engine located on the server back end, and suppose to transfer to the client side, we can use dynamica compress.
Scott Forsyth’s pointed out:”Compression is a trade-off of CPU for Bandwidth.”, one of the new feature in IIS 7 is web masters can customize IIS compression strategy based on the actual need, you can modify the applicationHost.config under “%windir%\System32\inetsrv\config”, below is my sample:
01<httpCompression staticCompressionEnableCpuUsage="80" dynamicCompressionDisableCpuUsage="80" directory="%SystemDrive%\inetpub\temp\IIS Temporary Compressed Files">
02    <scheme name="gzip" dll="%Windir%\system32\inetsrv\gzip.dll" />
03    <staticTypes>
04        <add mimeType="text/*" enabled="true" />
05        <add mimeType="message/*" enabled="true" />
06        <add mimeType="application/x-javascript" enabled="true" />
07        <add mimeType="application/atom+xml" enabled="true" />
08        <add mimeType="application/xaml+xml" enabled="true" />
09        <add mimeType="*/*" enabled="false" />
10    staticTypes>
11    <dynamicTypes>
12        <add mimeType="text/*" enabled="true" />
13        <add mimeType="message/*" enabled="true" />
14        <add mimeType="application/x-javascript" enabled="true" />
15        <add mimeType="*/*" enabled="false" />
16    dynamicTypes>
17httpCompression>
More detailed is described here: http://www.iis.net/ConfigReference/system.webServer/httpCompression
PS, Dynamic Compress is not installed by default, we need install it by turning on Windows Features:

My server host provider uses IIS 6.0 and does NOT enabling compression, I checked compression status for http://wayneye.com by using the free tool provided by port80software and the result is:

WOW, I must convince them to enable gzip compression!!

Programmatically compression using C#

We can also programmatically compress the ASP.NET http response, for example I want to transfer a large CSVfile to the client, a simple ASPX page named ReturnGzipPackage.aspx:
1protected void Page_Load(object sender, EventArgs e)
2{
3    Response.Headers.Add("Content-Disposition", "attachment; filename=IAmLarge.csv");
4    Response.ContentType = "text/csv";
5    Response.TransmitFile("D:\\IAmLarge.csv");
6    Response.End();
7}
If the request was submitted by a client browser, browser will automatically decompress the Http package,  but in the Windows client application or Windows Service, we developers can also adopt gzip compression to save bandwidth, once received gzip Http package from the server, we can programmatically decompressing, I wrote a client console application to submit the Http request and receive/decompress the Http response package.
01/* Submit Http request to server with Accept-Encoding: gzip */
02WebClient client = new WebClient();
03// It is mandatory by the client, if this header information is not specified, server will return the original content type, in my case, it is: text/csv
04//client.Headers.Add("Accept-Encoding", "gzip");
05
06using(Stream gzipData = client.OpenRead("http://localhost/StudyASPNET/gzipHttp/ReturnGzipPackage.aspx"))
07{
08    WebHeaderCollection responseHeaders = client.ResponseHeaders;
09
10    using(GZipStream gzip = new GZipStream(gzipData, CompressionMode.Decompress))
11    {
12        using(StreamReader reader= new StreamReader(gzip))
13        {
14            String content = reader.ReadToEnd();
15            File.WriteAllText("D:\\Downloaded.csv", content);
16        }
17    }
18}
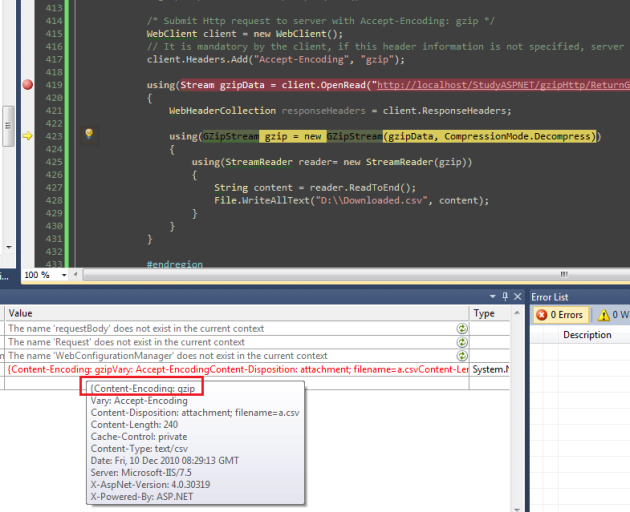
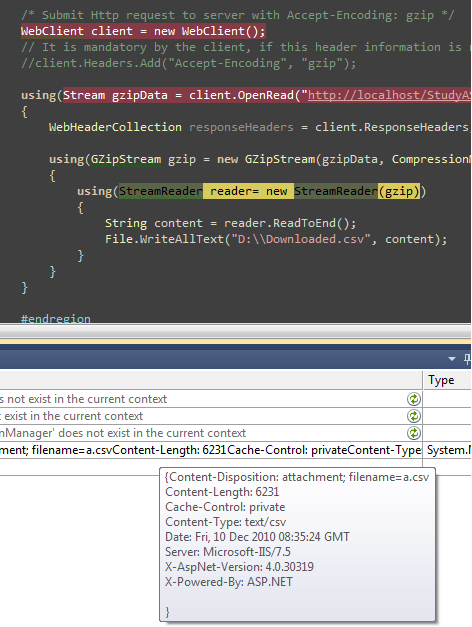
Please be aware of one thing: “Accept-Encoding: gzip” is supported by all browsers by default, i.e. browser will automatically decompresses compressed Http package, so in the code we MUST explicitly specify “Accept-Encoding: gzip“, below is what I investigated:
First time, I explicitly set “Accept-Encoding: gzip”, the Http response header contains “Content-Encoding: gzip“, and the depression/file saving operations complete without any issues.

Second time, I commented out the code, the result is, received Http headers does NOT contain content encoding information, since the server deemed you doesn’t accept gzip encoded content, it won’t return you compressed file, instead, it returned the original file, in my case, the csv file itself.

Conclusion & Hints

Using Http Compression is one of the best practice to speed up the web sites, usually consider compress files like below:
  1. Doesn’t change frequently.
  2. Has a significant compress-rate such as Html, XML, CSV, etc.
  3. Dynamically generated and the server CPU has availability.
Please be aware that do NOT compress JPG, PNG, FLV, XAP and those kind of image/media files, since they are already compressed, compress them will waste CPU resources and you got a compressed copy with few KBs reduced:)

Tips for ASP.NET Application Performance Enhancement

Hi All,

Though I have written about this some time back, Performance and Scalability stand next to Security in the case of Applications and is the most sought after topic wherever people raise queries.

I have compiled a set of Tips and Tricks to improve the performance of ASP.NET Applications in particular, where I have drilled down and explored a lot and have faced crunch situations from which I keep learning.

These tips can be followd during deploying ur app on the production server

A Foreword is that, these are general tips and are not exhaustive and its always better to share any new thoughts whenever we arrive at them, which will benefit the rest of the community.

Now, lets drill down into the Tips :)

In the Application Web.Config File

1. Set debug=false under compilation as follows:-


When you create the application, by default this attribute is set to "true" which is very useful while developing. However, when you are deploying your application, always set it to "false"

Setting it to "true" requires the pdb information to be inserted into the file and this results in a comparatively larger file and hence processing will be slow.

Therefore, always set debug="false" before deployment.

2. Turn off Tracing unless until required.

Tracing is one of the wonderful features which enable us to track the application's trace and the sequences. However, again it is useful only for developers and you can set this to "false" unless you require to monitor the trace logging. You can turn off tracing as follows:-


3. Turn off Session State, if not required.

ASP.NET Manages session state automatically. However, in case you dont require Sessions, disabling it will help in improving the performance.

You may not require seesion state when ur pages r static or whn u dont need to store infor captured in the page.

You can turn off session state as follows:-


While developing using Visual Studio.NET

1. Select the Release mode before making the final Build for your application. This option is available in the Top Frame just under the Window Menu option. By default, the Mode is Debug

There are several things happening when you Build/Re-Build applications in the Debug Mode. First of all, it creates an additional PDB File under your BIN directory. This holds all the Debug information.

Secondly, the Timeout is very high since you require higher time out frequency while debugging such that your process hangs on until you get to the exact break point where error is there.

So, selecting Release Mode will greatly improve the performance of the application when u deploy.

General Methods to improve the Performance

1. Disable ViewState as and when not required.
ViewState is a wonderful technique which preserves the state of your form and controls. However, its a overhead since all the information needs to be stored in the viewstate and particularly if you are building applications which target Dial Up Internet Connection Users, ViewState can make your application very slow. In case you dont require viewstate, disable it.

You can disable it at different levels ex., for Page, Control etc., by setting
EnableViewState="false"

2. Avoid Frequent round trips to the Database.
Calls made to Database can be quite expensive in terms of response time as well as resources and it can be avoided by using Batch Processing.

Make calls to Database as mininal as possible and make them last even lesser time. Use of DataAdapter wherever applicable is very useful since, it automatically opens and closes Connection whenever required and doesnt require user to explicitly open the connection.

A number of connections opened and not closed adequately can directly influence in performance slow down.

3. Avoid Throwing Exceptions.
Exceptions are a greate way to handle errors that occur in your application logic. However, throwing exceptions is a costly resource and must be avoided. Use specific exceptions and use as minimal as possible to avoid resource overhead.

For example, catching a SQLException is better when you expect only those kind of exceptions instead of a generic Exception.

4. Use Caching to improve the performance of your application.
OutputCaching enables your page to be cached for specific duration and can be made invalid based on various paramters that can be specified. The Cache exists for the duration you specify and until that time, the requests do not go to the server and are served from the Cache.

Do not assign cached items a short expiration. Items that expire quickly cause unnecessary turnover in the cache and frequently cause more work for cleanup code and the garbage collector.

In case you have static as well as dynamic sections of your page, try to use Partial Caching (Fragment Caching) by breaking up your page into user controls and specify Caching for only those Controls which are more-or-less static.

For more details regarding caching look into
ASP.NET Caching Features

5. Use appropriate Authentication Mechanism.
The Authentication Mechanism you choose determines the cost associated with it and hence select the appropriate mechanism. An informal but useful order is as follows:-

Authentication Modes

1. None
2. Windows
3. Forms
4. Passport

6. Validate all Input received from the Users.
User Input is Evil and it must be thoroughly validated before processing to avoid overhead and possible injections to your applications. Use Client Side Validations as much as possible. However, do a check at the Server side too to avoid the infamous Javascript disabled scenarios.

7. Use Finally Method to kill resources.
In your Try..Catch.. Block, always use the Finally method to close Open connections, Open DataReaders, Files and other resources such that they get executed independent of whether the code worked in Try or went to Catch.

The Finally method gets executed independent of the outcome of the Block.

8. The String and Stringbuilder Magic.
Perhaps the most ignored type in .NET is the stringbuilder. I am sure many of us are not even aware of Stringbuilder and its advantage over string (atleast I didnt know for 1 year :))

String is Evil when you want to append and concatenate text to your string. In other words, if you are initially creating a string say s = "Hello". Then you are appending to it as s = s + " World"; You are actually creating two instances of string in memory. Both the original as well as the new string will be stored in the memory. For that matter, all the activities you do to the string are stored in the memory as separate references and it must be avoided as much as possible.

Use StringBuilder which is very useful in these kind of scenarios. For the example above, using a StringBuilder as s.Append(" World"); which only stores the value in the original string and no additional reference is created.

9. Avoid Recursive Functions / Nested Loops
These are general things to adopt in any programming language, which consumes lot of memory. Always avoid Nested Loops, Recursive functions, to improve performance.

Having said that, proper functions and call backs do increase the performance instead of having a huge chunk of lines of code in single method.

The above are just pointers to improve the performance of your application and are just illustrative. There are many more ways in which you can improve the performance of your applications. I havent dealt with IIS and SQL Server side tips to improve performance which I would explain in my forthcoming articles.

The above are my view and a collective response from various resources and you are welcome to share your views / corrections if any.

Cheers and Happy Programming !!!

Friday, February 24, 2012

Execute Most Frequent Queries with Keyboard Shortcut Keys

(If you are looking for commonly used keyboard shortcut keys for Sql Server Management Studio click here)

With my recent job, I am facing a problem to type frequently used queries again and again in query analyzer to execute. Searched for the best solution to avoid my typing practice and I found following ways to accomplish my task


  1. Write down queries that I need frequently and save them separately on my hard drive and to get them back, click on open file and connect it to my required Database Server and EXECUTE.
  2. Using Project
  • Create a new Project by selecting a template SQL SERVER SCRIPTS
  • Go to Solution Explorer, right click Queries folder and click on New Query.
  • Type your new query and save it.
  • Now we can use query by just double click on your required one.
Second method really helped me to write down my long query scripts and run these scripts with out retyping them, and without any trouble to browse and find these queries.

But for short queries and some long scripts too, which are more often used in my current projects. I tried to find out more quick ways and come a cross to Keyboard Shortcuts Keys to execute these most frequently used queries.


Is it possible in Sql Server Management Studio?


Yes, though with limitations, but it is possible to execute your frequently used queries with shortcuts keys.


Limits:


1. Execute queries by writing them in single line.
2. Max 32767 characters long query is possible
3. Parameters can’t be declared
4. Store Procedures, that doesn't require any parameter value or with default values are possible to execute


How to do?


1. Open Sql Server Management Studio
2. In menu bar click on tools and select options
3. Expend “Environment” and click on Keyboard


We can find that shortcut keys for three commonly used System Stored Procedures are already created.
• sp_help
• sp_who
• sp_lock


Lets create shourtcut key for our own query
(for adventureworks )


SELECT * FROM Production.Product

Press OK button to save your changes and restart Sql Server Management Studio. Now open a new query (Ctrl+N) for your adventureworks database and press Ctrl+3
Here is your result without typing any query in qurery analyzer
You can also execute stored procure by assigning it a shortcut key by above mentioned method. For demonstration we will create a commonly used stored procedure written by Tara Kizar, isp_ALTER_INDEX . Before assigning it a shortkut key, edit this stored procedure and assign a default value for @dbName.
To execute stored procedure just press Ctlr + 4

Tuesday, February 21, 2012

SQL SERVER – Stored Procedure Optimization Tips – Best Practices

We will go over how to optimize Stored Procedure with making simple changes in the code. Please note there are many more other tips, which we will cover in future articles.

  • Include SET NOCOUNT ON statement: With every SELECT and DML statement, the SQL server returns a message that indicates the number of affected rows by that statement. This information is mostly helpful in debugging the code, but it is useless after that. By setting SET NOCOUNT ON, we can disable the feature of returning this extra information. For stored procedures that contain several statements or contain Transact-SQL loops, setting SET NOCOUNT to ON can provide a significant performance boost because network traffic is greatly reduced.
CREATE PROC dbo.ProcName
AS
SET
NOCOUNT ON;
--Procedure code here
SELECT column1 FROM dbo.TblTable1
-- Reset SET NOCOUNT to OFF
SET NOCOUNT OFF;
GO
  • Use schema name with object name: The object name is qualified if used with schema name. Schema name should be used with the stored procedure name and with all objects referenced inside the stored procedure. This help in directly finding the complied plan instead of searching the objects in other possible schema before finally deciding to use a cached plan, if available. This process of searching and deciding a schema for an object leads to COMPILE lock on stored procedure and decreases the stored procedure’s performance. Therefore, always refer the objects with qualified name in the stored procedure like
SELECT * FROM dbo.MyTable -- Preferred method
-- Instead of
SELECT * FROM MyTable -- Avoid this method
--And finally call the stored procedure with qualified name like:
EXEC dbo.MyProc -- Preferred method
--Instead of
EXEC MyProc -- Avoid this method
  • Do not use the prefix “sp_” in the stored procedure name: If a stored procedure name begins with “SP_,” then SQL server first searches in the master database and then in the current session database. Searching in the master database causes extra overhead and even a wrong result if another stored procedure with the same name is found in master database.
  • Use IF EXISTS (SELECT 1) instead of (SELECT *): To check the existence of a record in another table, we uses the IF EXISTS clause. The IF EXISTS clause returns True if any value is returned from an internal statement, either a single value “1” or all columns of a record or complete recordset. The output of the internal statement is not used. Hence, to minimize the data for processing and network transferring, we should use “1” in the SELECT clause of an internal statement, as shown below:
IF EXISTS (SELECT 1 FROM sysobjects
WHERE name = 'MyTable' AND type = 'U')
  • Use the sp_executesql stored procedure instead of the EXECUTE statement.
    The sp_executesql stored procedure supports parameters. So, using the sp_executesql stored procedure instead of the EXECUTE statement improve the re-usability of your code. The execution plan of a dynamic statement can be reused only if each and every character, including case, space, comments and parameter, is same for two statements. For example, if we execute the below batch:
DECLARE @Query VARCHAR(100)
DECLARE @Age INT
SET
@Age = 25
SET @Query = 'SELECT * FROM dbo.tblPerson WHERE Age = ' + CONVERT(VARCHAR(3),@Age)
EXEC (@Query)
If we again execute the above batch using different @Age value, then the execution plan for SELECT statement created for @Age =25 would not be reused. However, if we write the above batch as given below,
DECLARE @Query NVARCHAR(100)
SET @Query = N'SELECT * FROM dbo.tblPerson WHERE Age = @Age'
EXECUTE sp_executesql @Query, N'@Age int', @Age = 25
the compiled plan of this SELECT statement will be reused for different value of @Age parameter. The reuse of the existing complied plan will result in improved performance.
  • Try to avoid using SQL Server cursors whenever possible: Cursor uses a lot of resources for overhead processing to maintain current record position in a recordset and this decreases the performance. If we need to process records one-by-one in a loop, then we should use the WHILE clause. Wherever possible, we should replace the cursor-based approach with SET-based approach. Because the SQL Server engine is designed and optimized to perform SET-based operation very fast. Again, please note cursor is also a kind of WHILE Loop.
  • Keep the Transaction as short as possible: The length of transaction affects blocking and deadlocking. Exclusive lock is not released until the end of transaction. In higher isolation level, the shared locks are also aged with transaction. Therefore, lengthy transaction means locks for longer time and locks for longer time turns into blocking. In some cases, blocking also converts into deadlocks. So, for faster execution and less blocking, the transaction should be kept as short as possible.
  • Use TRY-Catch for error handling: Prior to SQL server 2005 version code for error handling, there was a big portion of actual code because an error check statement was written after every t-sql statement. More code always consumes more resources and time. In SQL Server 2005, a new simple way is introduced for the same purpose. The syntax is as follows:
BEGIN TRY
--Your t-sql code goes here
END TRY
BEGIN CATCH
--Your error handling code goes here
END CATCH

Monday, February 20, 2012

Top 10 performance tuning tips for relational databases

Although newer relational databases and faster hardware run most SQL queries with a significantly small response time, there is always room for improvement. This paper lists 10 tips that every developer/DBA should consider when designing their database or writing SQL scripts. It also talks about some common mistakes developers typically make and how to avoid them.
Since most relational databases share same design concepts under their hood, this paper is not specific to any particular vendor. Although in our example we talk about five databases, these tips apply to a wider range of RDBMS.

Scenario

To help explain SQL queries mentioned in this document, we will assume a database with following tables. The remainder of this paper uses these tables as reference in explaining pros and cons of the design.
Table schema for Customer
Field NameData TypePrimary Key
CustomerIDIntegerYes
FirstNameVarchar(30)
LastNameVarchar(30)
CityVarchar(30)
StateVarchar(10)
PhoneVarchar(15)
AccountCreatedOnDatetime
Indexes for Customer
Index NameFieldsClustered
CustPKCustomerIDYes
IdxStateState
IdxPhonePhone
IdxNameFirstName, LastName
IdxCityCity, State

Table schema for Orders
Field NameData TypePrimary Key
OrderIDIntegerYes
CustomerIDInteger
OrderDateDatetime
OrderCostDecimal
ShippedChar(1)
Indexes for Orders
Index NameFieldsClustered
OrderPKOrderIDYes
IdxCustDateCustomerID, OrderDate

Tip 1 - Database statistics

The most important resource to any SQL optimizer is the statistics collected for different tables within the catalog. Statistics is the information about indexes and their distribution with respect to each other. Optimizer uses this information to decide the least expensive path that satisfies a query. Outdated or missing statistics information will cause the optimizer to take a less optimized path hence increasing the overall response time. Following table lists SQL commands for different database that is used to update statistics. For further details, refer to the reference manual for your particular RBDMS

Oracle: ANALYZE command or DBMS_UTILITY package
DB2: RUNSTATS command
MS SQL Server: UPDATE STATISTICS
Informix: UPDATE STATISTICS
Sybase ASE: UPDATE STATISTICS
Optimizers always tend to select the least expensive path \u2013 one that returns least number of rows in fastest time. Why do optimizers rely on statistics? Consider the following query that is run against our sample database to answer this question.

select *
from customer
where city = 'New York City'
    and phone = '212-555-1212'
Notice that the above query contain two fields in the "WHERE" clause and there are two indexes defined, each containing one field. One very important notion to remember is that the optimizer can only use ONE index per table. Therefore, it has to make a decision as to which index to use. Since phone number should return least amount of rows, our query will run much faster if the optimizer always uses IdxPhone. However, if statistics are not updated, the optimizer does not know which index is better and may decide to choose IdxCity since 'city' field appears first in our WHERE clause. Once you update statistics the database will know more about the data distribution and will correctly choose the better index to run your query.

Tip 2 - Create optimized indexes

SQL optimizer heavily depends on indexes defined for a particular table. Indexes are double-edged sword: no index will degrade performance of your SELECT statements and too many indexes will slow down your DML (INSERT, UPDATE, and DELETE) queries. Therefore, it is important to have a right balance of index on tables. Besides the number of indexes, fields that are involved and their order is also very important.
When creating indexes, estimate the number of unique values the column(s) will have for a particular field. For example, the idxCity index in our sample database is not a good candidate for an index. When you wish to search for customers in New York City, it can potentially return thousands of rows, which are then searched sequentially. Such indexes seldom help in speeding up SELECT queries and reduce the response time for DML queries.
Composite index - Indexes containing more than one field are called composite index. Such indexes should be created if you expect to run queries that will have multiple fields in the WHERE clause and all fields combined will give significantly less rows than the first field alone.
For example, in our sample database the index "IdxCustDate" is a composite index. This index is only useful if the ratio between customers and the number of their orders is high \u2013 meaning an average customer places more than 1000 orders. Creating a composite index on the Orders table when most customers have placed only a handful of order wastes not only spaces on the hard disk but have negative impact on DML queries.
Clustered index - A clustered index determines the physical order of data in a table - meaning the actual data is sorted according to the fields in the index. This is similar to a telephone directory, which arranges data by last name. There can be only one clustered index per table. These indexes are particularly efficient on columns that are often searched for range of values.
Although most databases support such index, they use a different terminology. For example Oracle calls it Index-Organized Table (IOT) whereas DB2, Informix, MS SQL Server and Sybase all call it clustered index.

Tip 3 - Avoid functions on RHS of the operator

Often developers use functions or method with their SQL queries. Consider the following example.
select *
from Customer
where YEAR(AccountCreatedOn) == 2005
and  MONTH(AccountCreatedOn) = 6
Note that even though AccountCreatedOn has an index, the above query changes the where clause such a way that this index cannot be used anymore.
Rewriting the query in the following way will increase the performance tremendously.

Select *
From Customer
Where AccountCreatedOn between '6/1/2005'
    and '6/30/2005'

Tip 4 - Predetermine expected growth

As mentioned earlier indexes have a negative impact on DML queries. One way to minimize this negative affect is to specify an appropriate value for fill factor when creating indexes. When an index is created, the data for indexed columns is stored on the disk. When new rows of data are inserted into the table or the values in the indexed columns are changed, the database may have to reorganize the storage of the data to make room for the new rows. This reorganization can take additional toll on DML queries. However, if you expect new rows on a regular basis in any table, you can specify the expected growth for an index. The terminology used for this expected growth is different in every database. The following table lists the terms used by different RDBMS for expected growth.

Oracle: PCTFREE - Percent Free
DB2: PCTFREE - Percent Free
MS SQL Server: FILL FACTOR
Informix: FILL FACTOR
Sybase ASE: FILL FACTOR

Tip 5 - Specify optimizer hints in SELECT

Although in most cases the query optimizer will pick the appropriate index for a particular table based on statistics, sometimes it is better to specify the index name in your SELECT query. For example, consider the following
SELECT *
FROM customer
WITH ( Index(IdxPhone))
WHERE city = 'New York City'
    and phone = '212-555-1212'
Notice the additional "WITH" clause after FROM. This example is specific to MS SQL Server. Every database use different syntax for specifying this value and they are quite different from each other. Refer to your RDBMS documentation for details.

Tip 6 - Use EXPLAIN

Most databases return the execution plan for any SELECT statement that is created by the optimizer. This plan is very useful in fine tuning SQL queries. The following table lists SQL syntax for different databases.
Oracle: EXPLAIN PLAN FOR >Your query<
DB2: EXPLAIN PLAN SET queryno = xxx for >Your query<
MS SQL Server: Set SHOWPLAN_ALL ON >Your query<
Informix: SET EXPLAIN
Sybase ASE: Set SHOWPLAN_ALL ON >Your query<
You can also use third party tools, such as WinSQL Professional from Synametrics Technologies to run EXPLAIN commands against databases.

Tip 7 - Avoid foreign key constraints

Foreign keys constraints ensure data integrity at the cost of performance. Therefore, if performance is your primary goal you can push the data integrity rules to your application layer. A good example of a database design that avoids foreign key constraints is the System tables in most databases. Every major RDBMS has a set of tables known as system tables. These tables contain meta data information about user databases. Although there are relationships among these tables, there is no foreign key relationship. This is because the client, in this case the database itself, enforces these rules.

Tip 8 - Two heads are better than one

Hard disk I/O is among the slowest resource on a computer, which becomes apparent as the size of your database increase. Many databases allow users to split their database onto multiple physical hard drives. In fact, some even go a step further and allow splitting the contents of a table on multiple disks. When you use multiple physical disks, I/O operations speed up significantly since more heads fetch data in parallel.

Tip 9 - Select limited data

The less data retrieved, the faster the query will run. Rather than filtering on the client, push as much filtering as possible on the server-end. This will result in less data being sent on the wire and you will see results much faster. Eliminate any obvious or computed columns. Consider the following example.

Select  FirstName, LastName, City
Where City  = 'New York City'
In the above example, you can easily eliminate the "City" column, which will always be "New York City". Although this may not seem to have a large effect, it can add up to a significant value for large result sets.

Tip 10 - Drop indexes before loading data

Consider dropping the indexes on a table before loading a large batch of data. This makes the insert statement run faster. Once the inserts are completed, you can recreate the index again.
If you are inserting thousands of rows in an online system, use a temporary table to load data. Ensure that this temporary table does not have any index. Since moving data from one table to another is much faster than loading from an external source, you can now drop indexes on your primary table, move data from temporary to final table, and finally recreate the indexes.

Summary

This document provides some helpful tips related to performance improvements against any relational database. We hope that after reading this document the reader can modify their design and/or queries within their application that returns optimum result.