Introduction
This article is an introduction to some of the
new features in
ASP.NET 4.0 and Visual Studio 2010 IDE.
Code Snippets
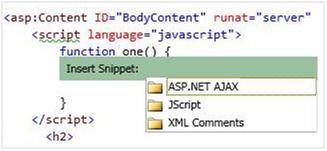
Code snippets are pre-developed code templates which can save time spent on thinking about the syntax. There are already a lot of built-in code snippets in VS2005 and VS2008. However, those are only available for the code-behind. Code snippets in VS2010 are introduced for JScript, HTML, and
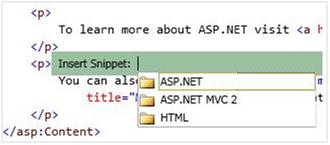
ASP.NET markup as well. In the screenshots below, we can see different snippet context menus for JScript and HTML.
Inside the
script tag, it would be
And inside the HTML:
New Profiles
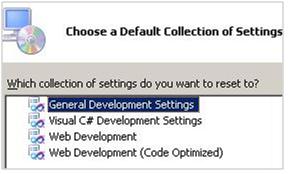
We have seen different development profiles in previous versions of .NET. Like VB, C#, Web Development, and General Development. We select a profile based on our priorities. These are selected after the first installation of Visual Studio or from the Import Export option.
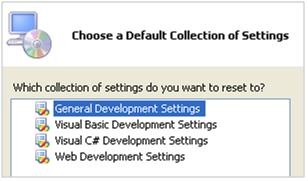
In VS2010, two more profiles are introduced and both support HTML developers. Those are:
- Web Development
- Web Development (Code Optimized)
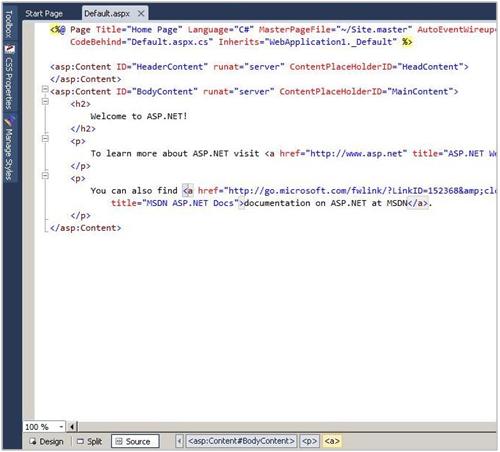
The
Web Development profile hides the client objects and events bar on top in HTML mode.
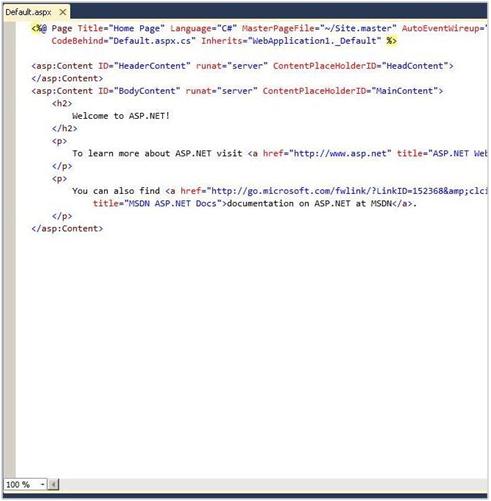
In
Code Optimized, you will find the HTML editor without code, and the designer tabs. So, it provides a more bigger area on the screen to play with HTML.
You can choose a profile after installation of Visual Studio on first use. You can also change the existing working profile from the Tools > Import & Export Settings > Reset all settings option. You will have to open and close Visual Studio if it does not show the changes in the IDE.
Generate From Usage
In previous versions of
ASP.NET, Microsoft introduced code refactoring to generate methods and identifiers from existing code. In
ASP.NET 4.0, there is a
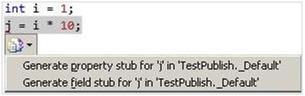
new concept of Generate From Usage - generates properties, methods, classes, and other types based on existing code.
Write some code, select it and right click on the left most character, and you will get options to change it to a property or method etc. This option is shown only if you do not define an identifier. For example, in the following example intellisense, it will not show the options to extract a property if you right click on the variable
i.
Multi-Targeting
In VS2008, it is possible to create a project in version 2.0 or 3.0, rather than developing in default 3.5. Also, there is an option to change a developed project's target framework version.
The same option is available in VS2010, but with one improvement. In the previous versions, if you create a project in framework 2.0, intellisense will still show you the types and members of 3.5 version as well, so there are more chances of error if you cannot identify the member of the chosen framework. But in VS2010, the intellisense will show you options for the appropriate framework only.
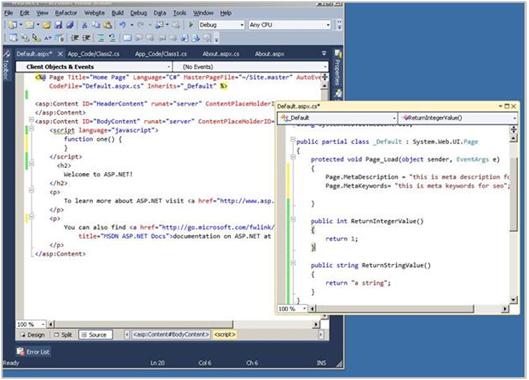
Multi-Monitor
Visual Studio 2010 provides us facility to move windows of the IDE outside of the Visual Studio IDE and place them on the desktop area. It also supports having different IDE windows on multiple monitors. If we close Visual Studio and open it again, we will find all the windows on the same places where we finished them last time.
Code Navigation in Class Files
Code Navigation
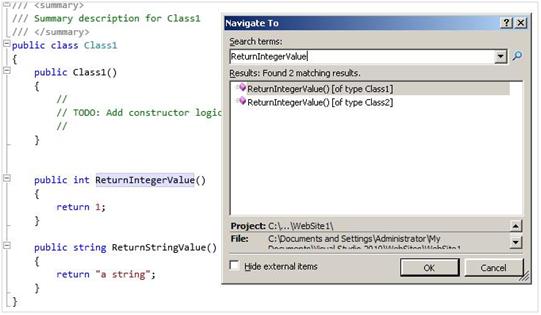
A
new Navigate To option gives us facility to search a term in a file more quickly. It searches the text as you type, but it works for class files only, i.e., it doesn't work for HTML or code-behind files. In the following example, it shows the function name as I type it in the Navigate To window; on selection of any, it will navigate to the function definition.
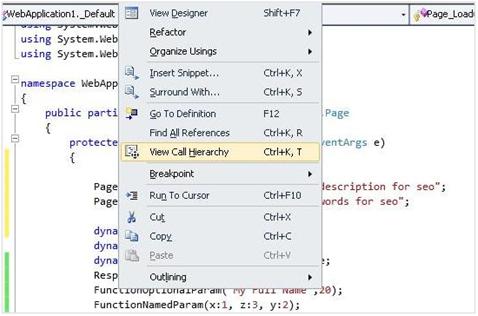
View Call Hierarchy
This featrure helps to see the use of a function and its properties. For example, if you right click on a function name, it will show you the hierarchical list of function usage.
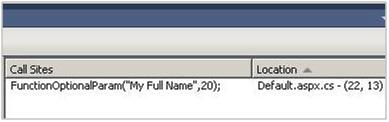
If you click View Call Hierarchy, it will show you a window with the details of the function calls:
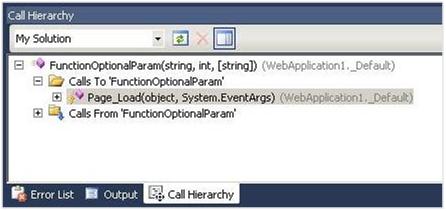
On selection of the function call in the hierarchy window, it will show the details of the parameters and the location of the function call.
Code Identifier Highlighting
On selection of an identifier, the IDE will highlight the places for you where it is utilized. For example, I selected variable
i and it highlights the different places it is used.

Intellisense Improvements
In VS2008, on selecting properties for an object, intellisense will show you the properties based on the alphabetical order as you type.
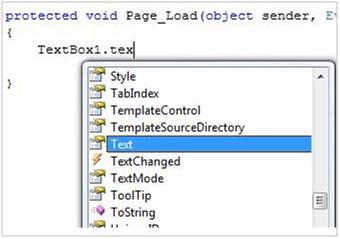
In VS2010, it shows you the properties based on groups. For example, if you type
text for a text box, it will show you the members based on the word
text, like
Text,
TextChanged,
TextMode. It also supports Pascal case intellisense. For example, if you type TC, it will navigate to the
TextChanged member.
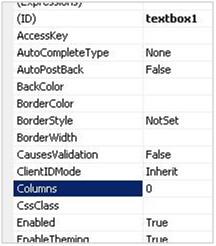
In the picture below, you can see the
ClientIDMode property in version 4, and if we change its target version from project properties, it will not show this attribute for the textbox.
EnablePersistedSelection
On selecting a row in controls like
DataList or
GridView, if we move to another page index, it selects the same numbered row on the
newly selected page, although we selected it only on the first page.
To avoid this,
ASP.NET 4.0 has introduced a
new property for these controls, called
EnablePersistedSelection. If you set it to
true, it will not select the same numbered row on other pages, and on navigation to the original page, for example, the first page, it will show the initially selected row as selected.
Web.Config Transformation
Normally, we set some values in
web.config for the development environment, and then we change those values manually at the time of deployment or testing.
For example, if we have a connection string or any key value combination in the
web.config file, and we want to replace those at the time of project publishing or deployment, then we can use the
new web.config transformation. It is an automatic way to perform this operation.
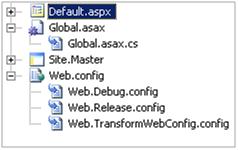
Web.config settings can be overridden by other config files like
web.release.config,
web.debug.config etc., at the time of debug, release. These values are not overridden in the original
web.config but in the published
web.config.
With the help of transformation, we can replace, remove, or delete a node, and for a node itself, we can remove or set attributes. For example:
- Create a config file from Configuration Manager > New:
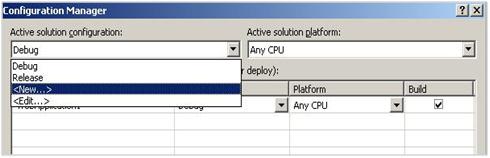
- Name it TransformWebConfig. Select Release from the Copy settings from option:
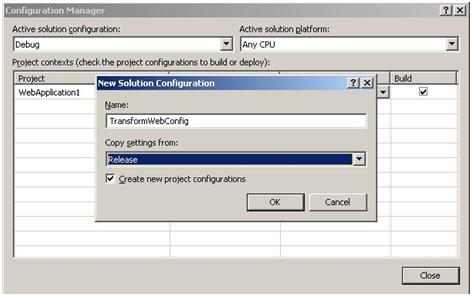
This will create TransformWebConfig.config.
- Right click on web.config and select the Add config transfroms option. Open the web.config and add a test key and the value to be changed.
 Collapse | Copy Code
<appSettings>
  <add key="KeyOne" value="A value"/>
</appSettings>
- Open TransformWebConfig.config and add the following line to it:
Collapse | Copy Code <appSettings>
<add key="KeyOne"
value="TestOnConfigurationConfig"
xdt:Transform="Replace"
xdt:Locator="Match(key)" />
</appSettings>Set the xdt:Transform attribute to Replace.
- Right click on the project and select Create Package. VS will get the values from the TransformWebConfig.config file, and it will change the value in the published web.config file for us.
On successful build, go to the
obj folder and check the
web.config file under the
TransformWebConfig folder; you will see the value
TestOnConfigurationConfig for the key
KeyOne.
URL Routing
Nowadays, we see that website URLs are more SEO specific and do not show any descriptive information. For example, rather than showing a URL like:
http://mywebsite.com/userprofiles.aspx?userid=1, developers would prefer to show the URL as:
http://mywebsite.com/mydetails.
URL mapping in
ASP.NET 2.0 provides us an option to achieve this functionality up to some extent. We can mention exact URLs to navigate and URLs to show to the user. But in the case of postback, this option starts showing the actual URL in the browser.
URL routing was introduced in
ASP.NET 3.5. Developers had to create different route handler classes depending on the number of URL routings for a website. The postback issue was solved with this URL routing option.
In
ASP.NET 4.0, you do not need to define separate handler classes for each routing. There is a built-in helper function
MapPageRoute which helps you to implement routing more quickly. These routes are registered on
Application_Start. For example, in this example, in
global.asax, the
SetRouting method sets routing, the first parameter is the router's friendly name, the second parameter is to check for the URL pattern to match, and the third is the ASPX page where this functionality would be implemented for the users.
Global.asax would be:
Collapse | Copy Code protected void Application_Start(object sender, EventArgs e)
{
SetRouting(System.Web.Routing.RouteTable.Routes);
}
private void SetRouting(System.Web.Routing.RouteCollection routeCollection)
{
routeCollection.MapPageRoute("RouteFriendlyName",
"MyWebsite/RequestParameterName",
"~/Book.aspx");
}Now,
Book.aspx would use the following code to proceed further:
Collapse | Copy Code string Parameter = Page.RouteData.Values["RequestParameterName"].ToString();
if (Parameter=="Chemistry"){....}
else if (Parameter=="Physics"){....}Now, if we navigate to
localhost/MyWebsite/Chemistry, it will go to the first
if condition.
Add Reference Dialog
In previous versions of Visual Studio, on opening the Add Reference dialog box, it will take some time to load .NET assembly files initially till the time it loads all the references from the GAC. In VS2010, on opening Add Reference, it opens the Projects tab by default.
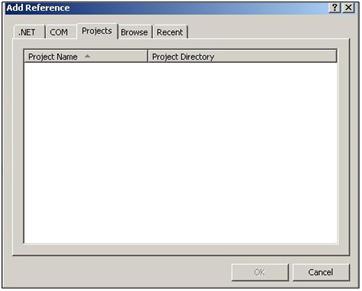
If you click on the .NET or COM tab by mistake, you still have an option of canceling it before it loads all the assemblies. So, the VS IDE does not freeze like before.
Compressing Session Values
ASP.NET session out-of-process state values are saved in a database or on the server. These are saved in a serialized format. Bigger session values consume more resources to be sent to the server. Now, those can be compressed with a
new built-in property
compressionEnabled. This attribute for the
sessionState element can be mentioned in the
web.config, like this:
Collapse | Copy Code <sessionState
mode="SQLServer"
stateConnectionString="connectionstring goes here"
compressionEnabled="true"/>
This option would be available for out-of-process sessions.
Improvements in C# 4.0
C# in .NET Framework 4.0 has some more things to offer. These are:
- Dynamic lookup
- Named
- Optional parameters
Dynamic Lookup
There is a
new static type named
dynamic. We can use it as object of any type. If there is any error on its usage, we would get it on runtime only. For example:
dynamic integerValue = 1;
dynamic stringValue = " a string";
dynamic Result = integerValue + stringValue;
Output of this would be:
1 a string.
But, if you change the last line to:
dynamic Result = integerValue & stringValue;
You will not get any compilation error, but the following error on runtime:
Operator '&' cannot be applied to operands of type 'int' and 'string'
Optional Parameters
To implement optional parameters, we used to create overloaded functions before
ASP.NET 4, but now, optional parameters are no more a restriction in C#. Like VB, optional parameters must be mentioned last. For example:
public void FunctionOptionalParam(string Name, int Age, string Country = "")
and we can call them without mentioning the value for the optional parameter.
FunctionOptionalParam("My Full Name",20);Named Parameters
Named parameters allow you to ignore the parameter order and mention parameters with names in a different order. For example:
public void FunctionNamedParam(int x, int y , int z)
On function call, it would be:
FunctionNamedParam(x:1, z:3, y:2);
Although we are sending a value for the parameter
z before its order in the function declaration, but these would be equal to x=1, y=2, z=3.
Meta Tags
The
HtmlMeta class can be used to add HTML meta tags dynamically.
HTMLMeta's
Name,
Content properties can be used to add any meta tag name and its values dynamically on runtime.
In
ASP.NET 4.0, the
Page class has two more properties:
MetaDescription and
MetaKeywords. These can be used to add meta values in HTML on runtime for the
description and
keyword elements. These can be mentioned as page attributes in HTML, or in this way:
Page.MetaDescription = "this is meta description";
Page.MetaKeywords = "this is a meta keyword";
If we see the HTML generated for this, it would be:
<head>
<meta name="description" content="this is meta description " />
<meta name="keywords" content="this is a meta keyword" />
</head>
Generating Client IDs
Client IDs for web controls are generated dynamically based on their parent controls. So if we use a textbox inside a web user control in a WebForm, we have to see what ID is generated for it and use it in the client script accordingly.
Sometimes, these are dynamic, or in the case of changing the user control name, it changes the ID for the child control as well. In
ASP.NET 4.0, this problem is solved by the
ClientIDMode attribute for the page. It has the following possible values:
AutoID,
Static,
Predictable, and
Inherit.
AutoID: It is the default setting for a webpage, and works like in the previous versions of ASP.NET. Static: It sets the static IDs for the web control, so we do not have to worry about the parent control ID and so on if we are referencing it in JavaScript. For example, a TextBox inside a user control and one outside it with ClientIDMode set to Static:
Collapse | Copy Code <asp:TextBox ID="textbox1"
runat="server" clientIDMode="Static"></asp:TextBox>
<uc1:WebUserControl ID="WebUserControl1" runat="server" />And this user control is the container for TextBox2:
Collapse | Copy Code <asp:TextBox ID="TextBox2"
ClientIDMode="Static" runat="server"></asp:TextBox>
This code will generate the following HTML:
Collapse | Copy Code <input name="ctl00$MainContent$textbox1"
type="text" id="textbox1" />
<input name="ctl00$MainContent$WebUserControl1$TextBox2"
type="text" id="TextBox2" />
If we remove the ClientIDMode set to static, the output would be like this:
Collapse | Copy Code <input name="ctl00$MainContent$textbox1"
type="text" id="MainContent_textbox1" />
It will generate the ID for TextBox as it does in previous versions of ASP.NET.
Predictable: If we use Predictable as ClientIDMode for web controls inside a GridView or ListView, then it will concatenate the GridView ID with the control ID and the value of the column mentioned in the ClientIDRowSuffiex attribute: Collapse | Copy Code Gridview ID ="GridView1"
ClientIDMode="Predictable"
ClientIDRowSuffix="ItemID"
If there is a Label in the GridView template column having the ID Label1 and it is bound with the ItemID column, it will generate an ID, GridView1_Label1_200.
If we use the ClientIDMode value of Predictable for web controls outside databound controls:
<asp:TextBox ID="TextBox1" runat="server"
  ClientIDMode="Predictable"></asp:TextBox>

<asp:Panel ID="panel1" runat="server">

<asp:TextBox ID="TextBox2" runat="server"
  ClientIDMode="Predictable"></asp:TextBox>

</asp:Panel>
You can see the output of the web controls in the panel and outside the panel.
<input name="ctl00$MainContent$TextBox1"
  type="text" id="MainContent_TextBox1" />

<div id="MainContent_panel1">

<input name="ctl00$MainContent$TextBox1"
  type="text" id="MainContent_TextBox1" />

</div>
It will generate the ID for all the web controls concatenated with the ID of the content panel of the child page.
Inherit: Web controls, by default, inherit from the parent container ID. Controls can override this attribute of the parent as well if we set a different value for ClientModeID.
Permanent Redirect
In a situation where we want to redirect users to a
newly developed page if current page is obsolete, we can use
Response.Redirect to shift the page to a
new page. But in this case, search engines keep the old information of the page in their indexes for search. Also, if a user navigates to this page, he would be redirected to this page and then to a
new page with the help of
Response.Redriect.
But in
ASP.NET 4.0, a
new command
Response.RedirectPermanent can be used to change the header information for the page on the server. So, if a user goes for a page, he is directly redirected to
new page and it saves a double trip for him.
Similarly, search engines, on re-indexing of that website and page, finds the updated header and updates the information in their index and shows the updated information on search.
New Browser Definitions
During the last few years of
ASP.NET 3.5, a few browsers have been introduced including Google Chrome and those which support Blackberry SmartPhones as well.
ASP.NET 4.0's
HTTPBrowserCapabilities class is updated with the support for
new browsers.
Publishing a Project
In VS2010, if you click the Properties link in Solution Explorer, you will find three
new tabs:
- Package/Publish
- Deploy SQL
- Silverlight Applications
I will discuss about the first two options.
Package/Publish
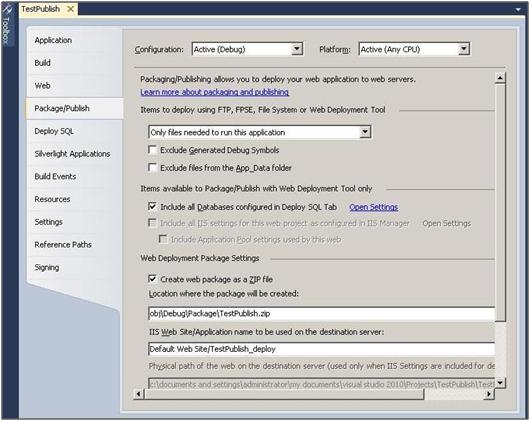
Package, Publish options provide you settings for the publish and package commands. The configuration option for Debug, Release provides options to set these values on compilation and build like in previous versions.
If the hosting server does not have SQL Express, or if you do not want to include those in the published files, then select Exclude files from the
App_Data folder. If you select the option
Create a web package as a ZIP file, it will create a zip file to be deployed. Otherwise, it would be an unzipped folder by default.
The default package folder is created under the
obj folder of the application. It is not be shown by default in the Solution Explorer until you select the
Show all files option. We can also set the web application name on the server and the destination server physical path as well.
Deploy SQL
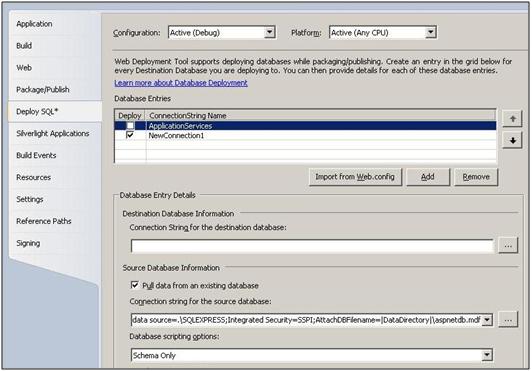
The Deploy SQL option allows you to set the connection string as part of the deployed package. You can add the connection strings manually with different names and values, or import from the
web.config by clicking the Import button. You can choose the script for
Schema Only or the database option as well. On selection of a connection string, it shows the source settings and we can set the values for the destination server.
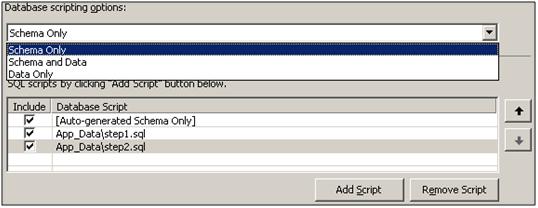
You can also add database script files manually by clicking the Add button. You can also change the order of SQL files to run on server.