Tutorial 1: Creating a Web Project and Connecting To the Database
To begin with, create an empty new ASP.NET Web Site Project (File->New Web Site) within Visual Web Developer. We can then connect and load our Northwinds database in the IDE. To-do this you can follow one of two approaches:
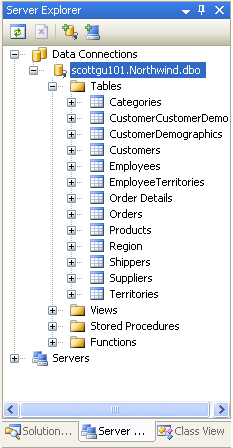
Option 1: Connect to a local or remote SQL 2000 or SQL 2005 database that has the Northwinds sample installed. To-do this, go to the “Server Explorer” property window in Visual Web Developer (choose View->Server Explorer if it isn’t currently visible), right-click on the “Data Connections” node and choose to add a new database connection. You can then walkthrough a wizard to pick your SQL database and load the Northwinds database in the IDE:
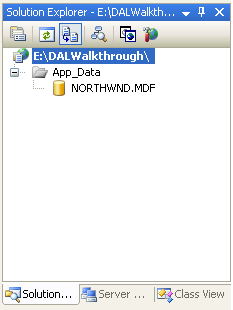
Option 2: If you don’t have a SQL 2000 or SQL 2005, you can alternatively use the free SQL 2005 Express Edition. Download this .zip file containing the Northwinds.mdf database file, and copy it to the “App_Data” directory underneath your web site’s root directory. Click the “Refresh” button in the solution explorer, and it will appear in the Solution Explorer:
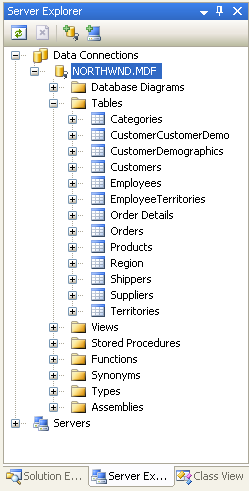
SQL Express databases within the App_Data directory will automatically show-up as a listed item in the Server Explorer property window (note: I sometimes get a timeout error the very first time I expand a newly copied sql express database here – I think because it is generating the log file the first time it is accessed. If this happens just click it again and it seems to immediately expands):
After the Northwinds database has been loaded using either Option #1 or Option #2 above, you can expand, view, edit, and add to any of the tables, stored procedures, views, triggers, etc with the database. You can also use the query builder to test out and run queries against the database (or right-click on a table and choose “Show Table Data” to see all of it).
Tutorial 2: Launching the DataSet Designer
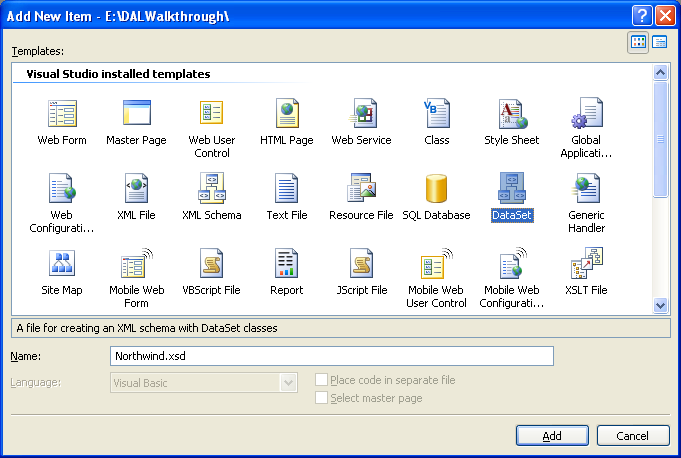
To create our Northwind DAL, right-click on the project node in the solution explorer, and select “Add New Item”. Then select the “DataSet” option and name it “Northwind.xsd”:
This will prompt me as to whether I want to add it under the “App_Code” directory. When I click “yes” it will bring up a data-design surface, and (if in a web project) automatically launch the “Create TableAdapter” wizard (if you are in a class library project you need to right click and choose “Add->Table Adapter to launch this wizard):
Tutorial 3: Creating our First Table Adapter
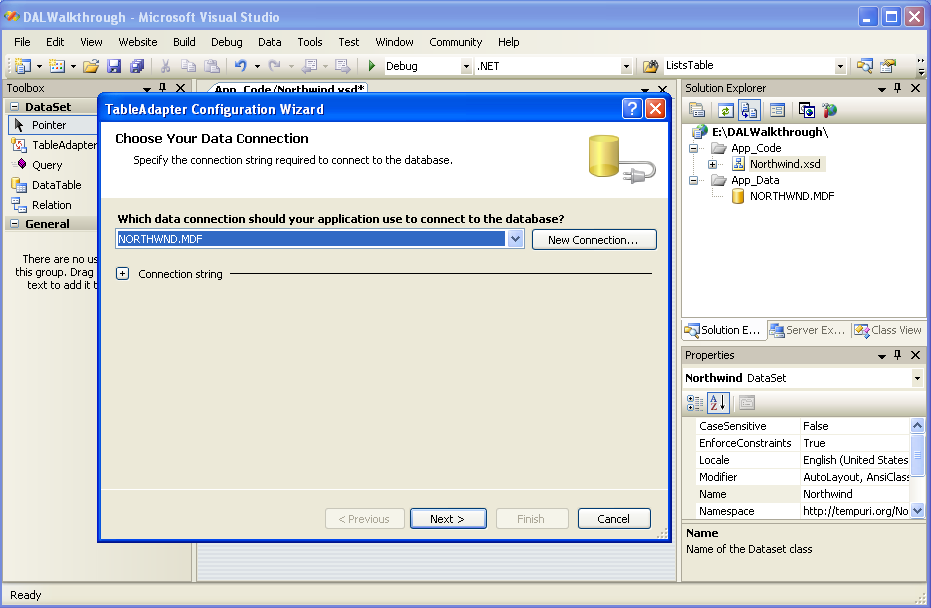
The “Create TableAdapter” wizard will first prompt me for the database to use, and provide a list of all database connections currently registered in Visual Web Developer’s server-explorer window (note: you can also create new connections from this wizard if you want).
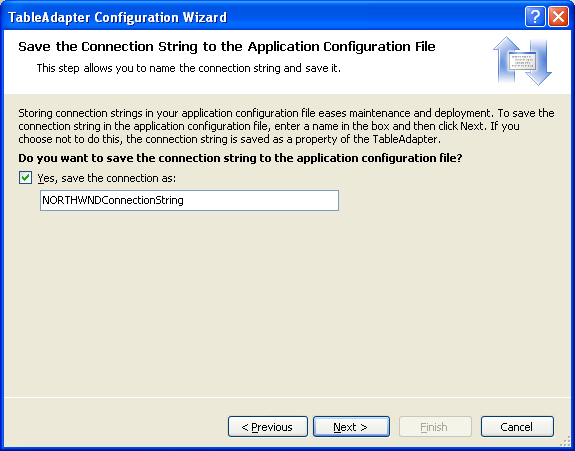
After I choose the Northwind database I want to use, it will prompt me for where to store the database connection-string. By default it will avoid hard-coding it within your code, and will instead save it within the new section of your web.config file (or app.config file if you are in a Class Library Project). Note that with .NET 2.0 you can now optionally encrypt configuration file values to keep them secure, as well as use the new ASP.NET 2.0 Property Page within the IIS GUI Admin Tool to change it later (ideal for administrators). Pick a name for what you want to call it:
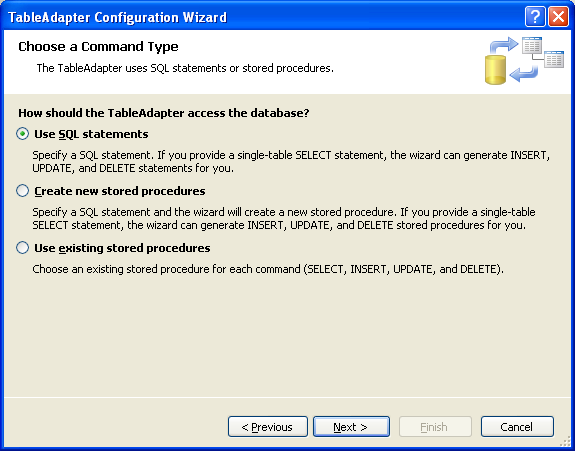
You can then choose how you want to configure the TableAdapter – you can use either SQL Statements that you embed within your DAL layer, or stored procedures (SPROCs) that you call from it:
For our first table adapter we’ll use a SQL Statement. You can either type this in directly within the next window:
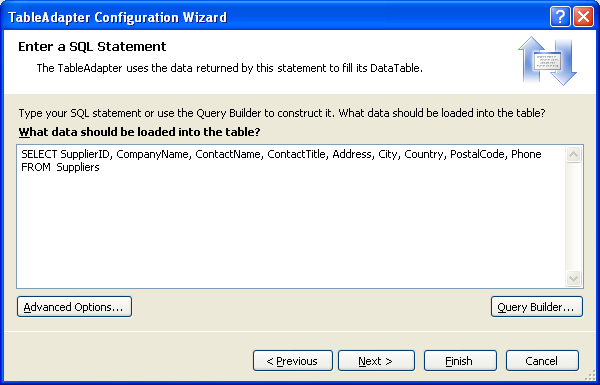
Or alternatively launch the query-builder from that wizard step to graphically construct it (one handy feature with it is the ability to execute test queries to validate results):
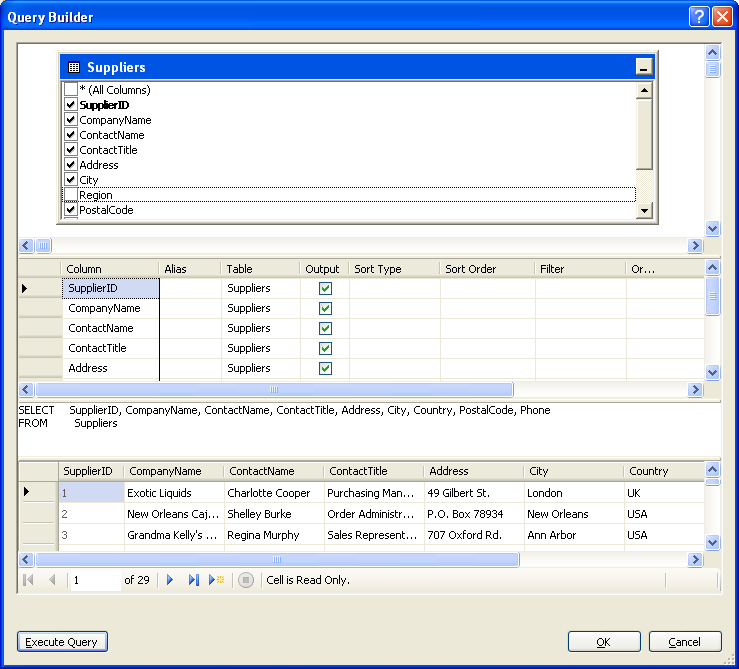
Once we’ve finished building and testing our query, we will return back to the “Enter a SQL Statement” page. Before moving to the next page, we’ll want to click the “Advanced Options” button to verify what type of operations we want the designer to generate:
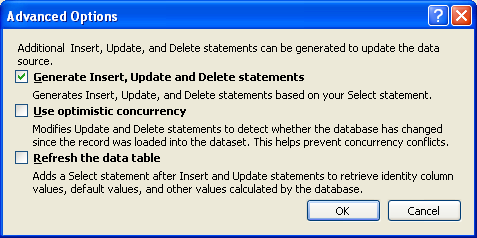
The above dialog shows the default settings that are set when you run the “Create TableAdapter” wizard from within a VS 2005 Web Site Project (these are the most common data patterns we typically see developer’s use with stateless web applications). When you run the wizard from within a Class Library Project or from a Windows Client Project, the “Use Optimistic Concurrency” checkbox will be selected by default as well.
For the purposes of this DAL walkthrough, we want to turn off optimistic concurrency (note: one of my later blog postings on optimistic concurrency will change that setting – but I will be showing straight updates first).
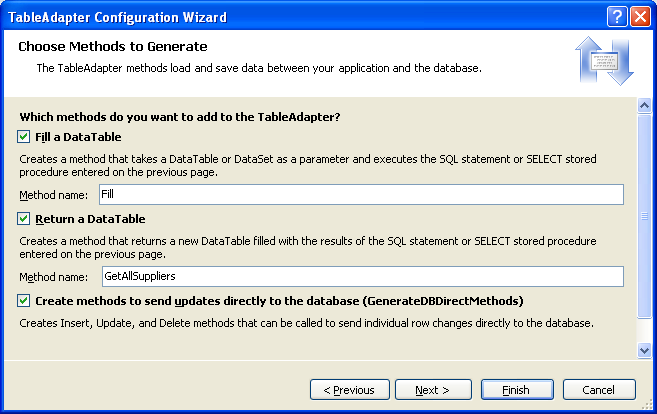
When we click next on the wizard again, we’ll be prompted for the method names we want to create in our DAL to run our Category SQL query. There are two patterns of data usage that this data wizard can generate – one is the “Fill” pattern used with DataSets, that will generate a method that accepts a DataSet or DataTable parameter that we want to add category information to. The second pattern of data usage is one where we will generate a method that will simply return a new DataTable containing our category information. This later approach is the one we’ll be primarily using in all of our later tutorials, and is more typical with stateless web-applications.
In the wizard I’m going to name this DataTable method “GetAllSuppliers”. I will also keep the “GenerateDBDirectMethods” checkbox to automatically create default Insert, Update and Delete methods based off of my Select query on the component:
The wizard will then list all of the DAL methods it will create as part of this wizard process for, and when I hit finish add them to our data designer:
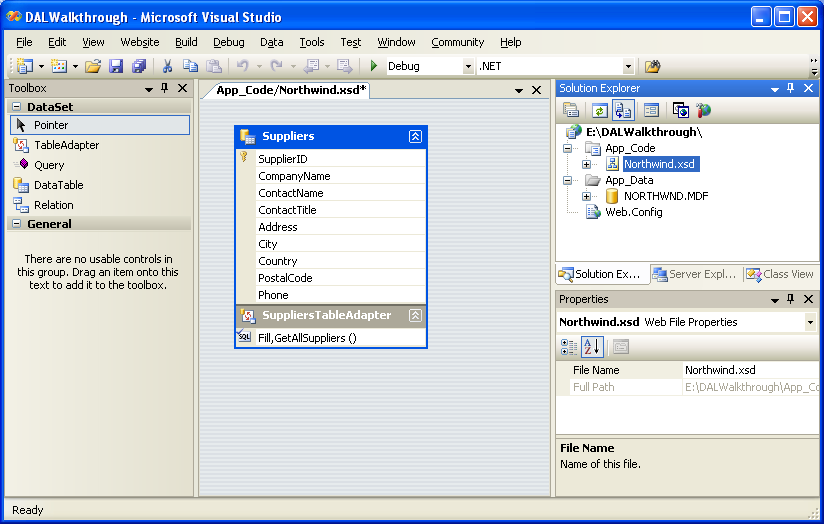
What I now have is a strongly-typed DataAdapter class (by default named “NorthwindTableAdapters.SuppliersTableAdapter”) with a “GetAllSuppliers” method that I can use to execute a SQL query and obtain back a strongly-typed DataTable results class (by default named “Northwind.SuppliersDataTable”).
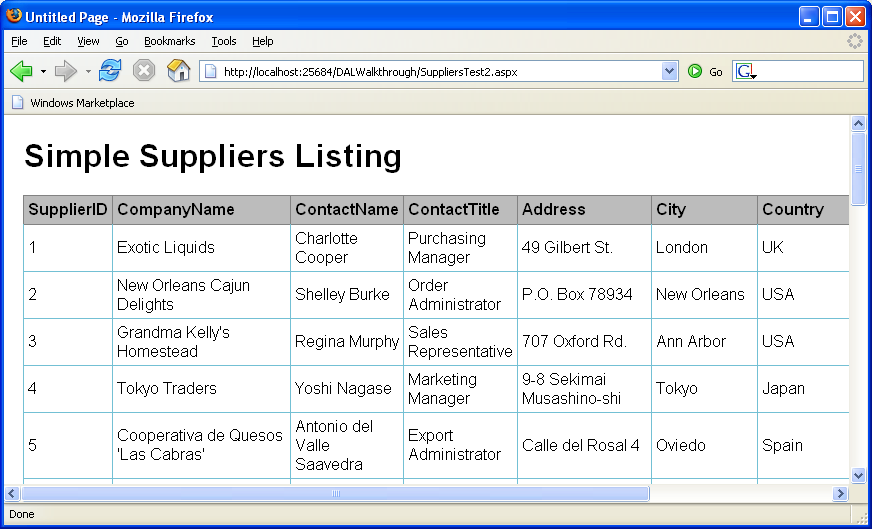
I could use these objects to easily obtain all of the Suppliers information from the Northwind database and output it within a page like so:
Dim suppliersAdapter As New NorthwindTableAdapters.SuppliersTableAdapterDim suppliers As Northwind.SuppliersDataTableDim supplier As Northwind.SuppliersRow
suppliers = suppliersAdapter.GetAllSuppliers()
For Each supplier In suppliersResponse.Write("Supplier: " & supplier.CompanyName & "
")Next
Notice that I don’t need to write any manual ADO.NET code, construct a SQL query, or manage connections at all in the above code – all of that is encapsulated by the SuppliersDataTable and SuppliersTableAdapter that we now have in our project. Notice also how the SuppliersTableAdapter class is strongly typed – meaning I get intellisense and compilation checking on the “suppliersAdapter.GetSuppliers()” method. I can also access each property returned in the Suppliers result in a strongly typed fashion (for example: supplier.CompanyName or supplier.SupplierID).
I could alternatively write the below .aspx page and associated .aspx.vb code-behind file to easily databind and output the results in a grid:
SuppliersTest2.aspx:
<%@ Page Language="VB" AutoEventWireup="false" EnableViewState="false" CodeFile="SupplierTest2.aspx.vb" Inherits="SuppliersTest2" %>
<html>
<head>
<title>Simple Category Listingtitle>
<link href="StyleSheet.css" rel="stylesheet" type="text/css" />
head>
<body>
<form id="form1" runat="server">
<div class="datatable">
<h1>Simple Category Listingh1>
<asp:GridView ID="GridView1" runat="server">
asp:GridView>
div>
form>
body>
html>
SuppliersTest2.aspx.vb:
Imports NorthwindTableAdapters
Partial Class SuppliersTest2Inherits System.Web.UI.Page
Protected Sub Page_Load(ByVal sender As Object, ByVal e As System.EventArgs) Handles Me.Load
Dim suppliersAdapter As New SuppliersTableAdapter
GridView1.DataSource = suppliersAdapter.GetAllSuppliers()GridView1.DataBind()
End Sub
End Class
Which then generates the below output at runtime:
Note that when using the new ASP.NET ObjectDataSource control we will be able to eliminate the need to write any code for the scenario above (which even now only has three lines), as well as to automatically enable paging, sorting and editing on the GridView without any page code needed. I’ll cover how to-do this in a later blog posting on using this DAL. My goal with the sample above was just to show how you could procedurally databind the GridView using techniques you might already be familiar with in ASP.NET 1.1.
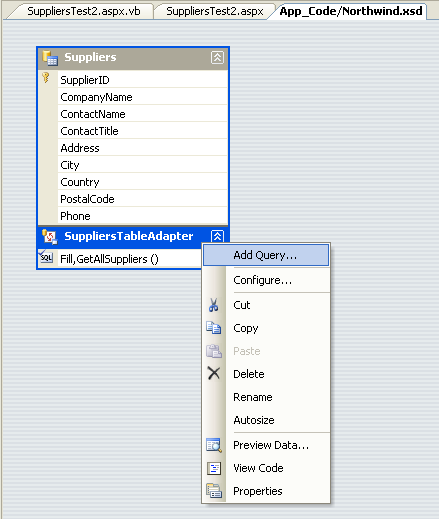
Tutorial 4: Adding Parameterized Methods within Table Adapters
It is usually pretty rare in web applications to want to request all of the data within a database table. More typically you’ll want to use SQL queries to retrieve only the subset of data that you need. The data designer makes it super easy to create multiple strongly-typed data-methods within a DAL to help with the parameterized SQL operations.
To add one to our Suppliers object, right-click on it and choose “Add Query”:
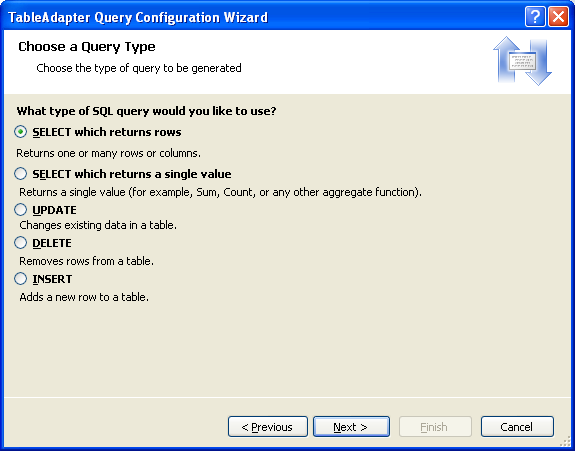
Once again we can choose either a stored procedure, or a SQL statement. For the SQL statement you can choose to return multiple rows, or just a single value (useful for things like SELECT Count(*) commands, or to retrieve a single value):
For this parameterized query I’m going to return multiple rows, and will be filtering the data by country value. I can express a parameter value using a “@parametername” syntax within my SQL statement like so (note: there can be any number of parameters in the SQL statement):
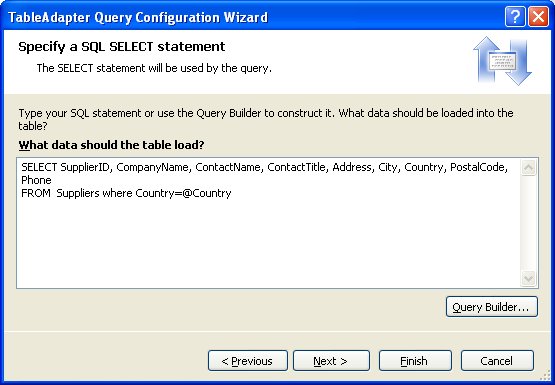
I can then name this parameterized data method “GetSuppliersByCountry”:
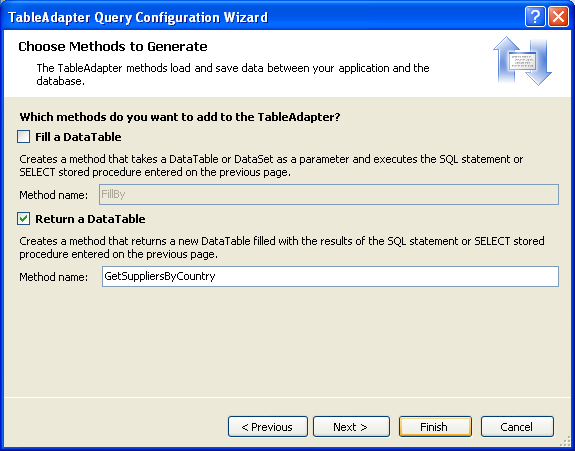
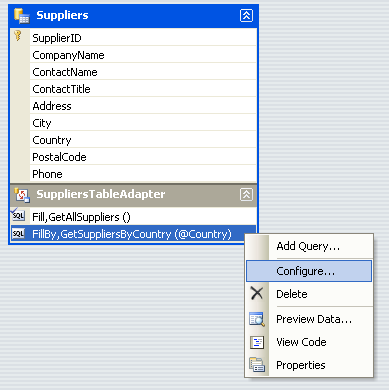
And now I have two methods I can use within my SuppliersTableAdapter to get Supplier data (GetAllSuppliers and GetSuppliersByCountry). Note that the designer is fully re-entrant, meaning you can at any point re-configure a data method (for example: to change the SQL statement, add/remove parameters, etc). Just right click and select the “configure” method to-do so:
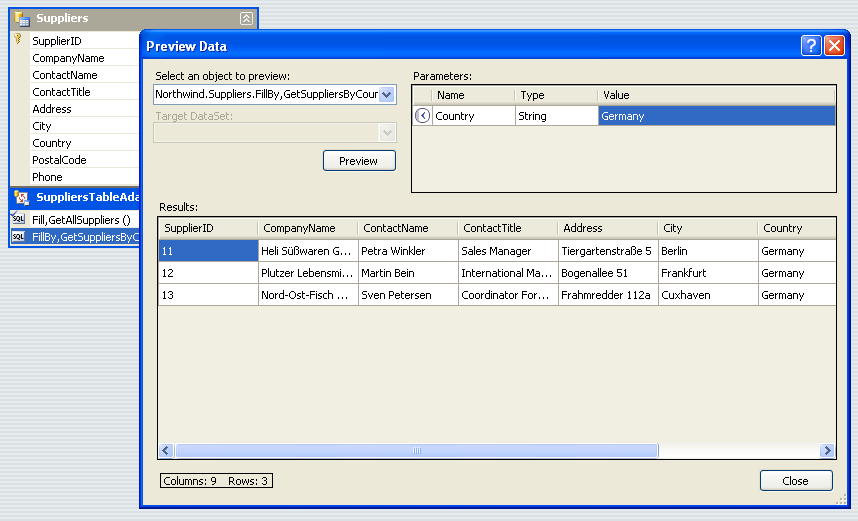
You can also use the designer to run any of the data methods. Just right-click and select “Preview Data” to execute them and see the results (note how any parameters can be specified as part of this operation):
And in code I can now easily build a page that uses this new method like so:
SuppliersByCountry.aspx:
<%@ Page Language="VB" AutoEventWireup="false" EnableViewState="false" CodeFile="SuppliersByCountry.aspx.vb" Inherits="SuppliersByCountry" %>
<html>
<head runat="server">
<title>Suppliers By Country Sampletitle>
<link href="StyleSheet.css" rel="stylesheet" type="text/css" />
head>
<body>
<form id="form1" runat="server">
<h1>Suppliers By Country:h1>
<div>
Select a country: <asp:TextBox ID="CountryTxt" runat="server" />
<asp:Button ID="SearchBtn" Text="Search" runat="Server" />
div>
<div class="datatable">
<asp:GridView ID="GridView1" runat="server">
asp:GridView>
div>
form>
body>
html>
SuppliersByCountry.aspx.vb:
Imports NorthwindTableAdapters
Partial Class SuppliersByCountryInherits System.Web.UI.Page
Protected Sub SearchBtn_Click(ByVal sender As Object, ByVal e As System.EventArgs) Handles SearchBtn.Click
Dim suppliersAdapter As New SuppliersTableAdapter
GridView1.DataSource = suppliersAdapter.GetSuppliersByCountry(CountryTxt.Text)GridView1.DataBind()
End Sub
End Class
Which will generate a Suppliers search page:
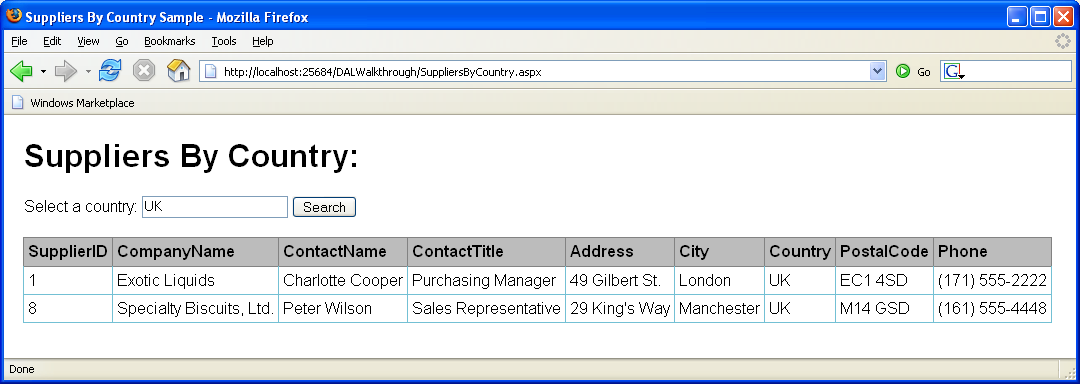
Note that I did not have to write any ADO.NET code, manually create parameter collections, manage connection objects etc. I only had to write 3 lines of code total to build the above sample from scratch using the Visual Web Developer data and page designers.
Tutorial 5: Using Insert, Update, and Delete DBDirect Commands on TableAdapters
Because we kept the default “GeneratedDBDirect Methods” checkbox selected, the Create Table Adapter wizard automatically added default Insert, Update and Delete methods to the SuppliersTableAdapter. You can see these, as well as edit/customize them further, by selecting the SuppliersTableAdapter object within the DataSet Designer and then looking at the property-grid (note: you must select the SuppliersTableAdapter heading to have these methods show up in the property grid – they won’t show up if you just select the Suppliers heading):
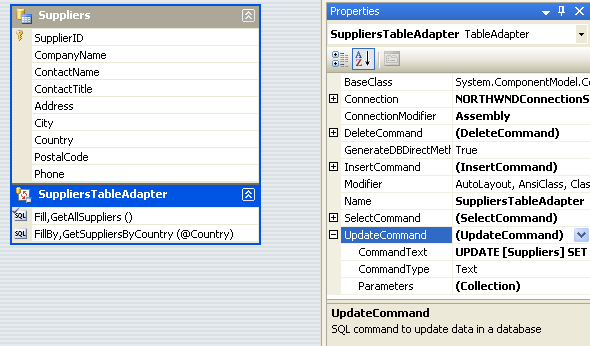
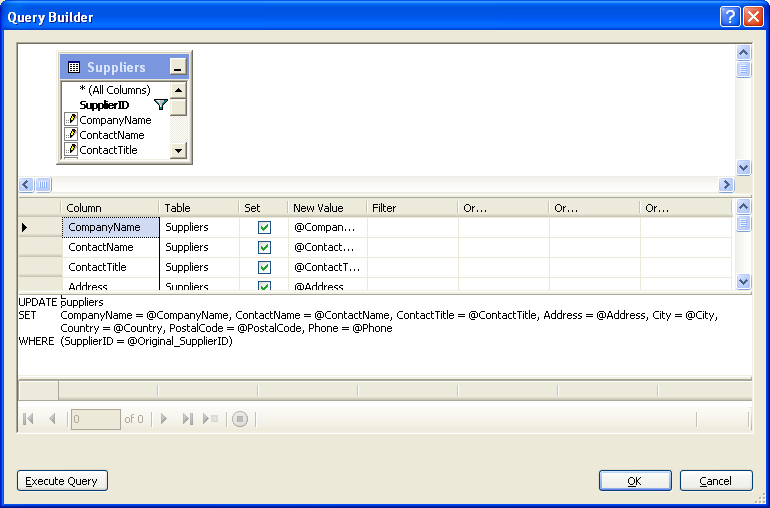
Using the “CommandText” property in the property-grid, you can pull up a query designer for each of the default statements and customize them:
You can also optionally add your own custom Insert/Update/Delete methods to each TableAdapter. For example, if I wanted to add a custom Insert method that had the additional behavior of returning the new identity column value of a newly created Supplier row (which has an auto-increment property set for the primary key), I could do so by right-clicking on the SuppliersTableAdapter and choosing “New Query”:
I’ll then pick doing the INSERT command with a SQL statement, and choose to create an Insert:

The DataSet designer will then automatically suggest the below SQL statement for me (it looks at the SELECT statement you entered earlier to suggest a default INSERT statement):
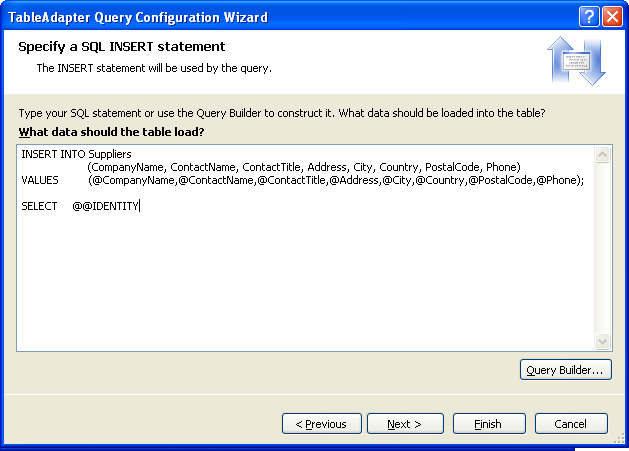
Note that the “SELECT @@Identity” statement at the end will return the newly created primary key from the insert operation. I could further customize the INSERT operation however I want.
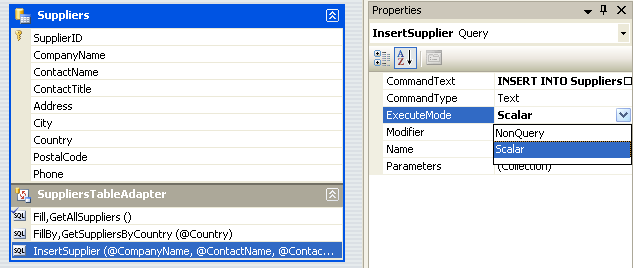
I can then use the wizard to name the method “InsertSupplier” (or any other name I want). The wizard will then add this method to the SuppliersAdapter. The last step I’ll do (since I want to return the @@Identity value from the insert), is to change the type of the InsertSupplier method from “NonQuery” to “Scalar”:
You could then write the code below to add a new supplier, and then update the supplier values, and then delete the supplier within the Suppliers table:
Dim supplierAdapter As New NorthwindTableAdapters.SuppliersTableAdapter
Dim supplierId As Integer
supplierId = supplierAdapter.InsertSupplier("Microsoft" _, "ScottGu" _, "General Manager" _, "One Microsoft Way" _, "Redmond" _, "USA" _, "98004" _, "425-555-1212")
supplierAdapter.Update("Microsoft" _, "Someone Else" _, "New title" _, "New Address" _, "New City" _, "UK" _, "New Zip" _, "New Number" _, supplierId)
supplierAdapter.Delete(supplierId)
Note that I did not have to write any ADO.NET code, manually create any parameter collections, or manage connection objects etc. Because the data designer generates typed methods and DataTables, I’ll get both intellisense/compilation-checking as well as type validation within my DAL (so for example: if I try to pass an integer instead of a DateTime it would give me a compile error).
Tutorial 6: Using DataTables to Insert/Update/Delete Suppliers
Tutorial 5 above showed how to use data methods directly on the SuppliersTableAdapter to manipulate individual rows within our database. Alternatively, developers can also work to perform these operations using the SuppliersDataTable and SuppliersDataRow objects. These are particularly useful when adding/updating/deleting multiple rows at a time (these updates can optionally be batched to the database in one database call using this approach).
The below example demonstrates how to retrieve all of the suppliers in the US with a single database call, then conditionally update some of the supplier’s zip-codes, and then add a new supplier. We’ll then update the database with all of the additions/changes:
Dim supplierAdapter As New NorthwindTableAdapters.SuppliersTableAdapterDim suppliers As Northwind.SuppliersDataTableDim supplier As Northwind.SuppliersRow
' Obtain all Suppliers in the USsuppliers = supplierAdapter.GetSuppliersByCountry("USA")
' Loop through all suppliers and update any 98042 postcodes to 98004For Each supplier In suppliers
If supplier.PostalCode = "98052" Thensupplier.PostalCode = "98004"End If
Next
' Create a New Supplier Just for Funsupplier = suppliers.NewSuppliersRow()
' Set new data properties on supplier2 rowWith supplier
.CompanyName = "Microsoft".ContactName = "ScottGu".Address = "One Microsoft Way".ContactTitle = "General Manager".City = "Redmond".PostalCode = "98052".Country = "USA".Phone = "425-555-1212"
End With
' Add New Supplier to SuppliersDataTablesuppliers.AddSuppliersRow(supplier)
' Update Database with all changes (updates + additions)supplierAdapter.Update(suppliers)
Note that there are fancier ways to-do filtering (and sorting) operations that I’m not using above, but I wanted to keep this tutorial simple as opposed to overload it with too many concepts.
Tutorial 7: Putting the Northwinds DAL Together
The above tutorials hopefully provide the basic background needed to create DAL’s using the DataSet designer and then use them from code.
Using the above knowledge, you should be able to go off and quickly create the following strongly-typed TableAdapters with associated data methods pretty easily (note that the designer and query builder can be used to avoid having to manually write any of the SQL queries below – and it will auto-suggest subsequent queries for each adapter after you add the first one).
SuppliersTableAdapter:
GetAllSuppliers:
SELECT SupplierID, CompanyName, ContactName, ContactTitle, Address, City, Country, PostalCode, Phone
FROM Suppliers
GetSuppliersByCountry:
SELECT SupplierID, CompanyName, ContactName, ContactTitle, Address, City, Country, PostalCode, Phone
FROM Suppliers
WHERE Country=@Country
GetSupplierBySupplierId
SELECT SupplierID, CompanyName, ContactName, ContactTitle, Address, City, Country, PostalCode, Phone
FROM Suppliers
WHERE SupplierId=@SupplierID
GetUniqueSupplierCountries
SELECT DISTINCT Country
FROM Suppliers
CategoriesTableAdapter:
GetAllCategories:
SELECT CategoryID, CategoryName, Description
FROM Categories
GetCategoryByCategoryId
SELECT CategoryID, CategoryName, Description
FROM Categories
WHERE CategoryId=@CategoryId
EmployeesTableAdapter:
GetAllEmployees:
SELECT EmployeeID, LastName, FirstName, Title, HireDate, Country, ReportsTo
FROM Employees
GetEmployeeByEmployeeID
SELECT EmployeeID, LastName, FirstName, Title, HireDate, Country, ReportsTo
FROM Employees
WHERE EmployeeID=@EmployeeID
GetEmployeesByManager:
SELECT EmployeeID, LastName, FirstName, Title, HireDate, Country, ReportsTo
FROM Employees
WHERE ReportsTo = @ReportsTo
ProductsTableAdapter:
GetAllProducts:
SELECT ProductID, ProductName, SupplierID, CategoryID, UnitPrice, UnitsInStock, Discontinued,
(SELECT Suppliers.CompanyName from Suppliers where Suppliers.SupplierId=Products.ProductId) as SupplierName
FROM Products
GetProductsBySupplierId:
SELECT ProductID, ProductName, SupplierID, CategoryID, UnitPrice, UnitsInStock, Discontinued,
(SELECT Suppliers.CompanyName from Suppliers where Suppliers.SupplierId=Products.ProductId) as SupplierName
FROM Products
WHERE SupplierID=@SupplierID
GetProductsByCategoryId:
SELECT ProductID, ProductName, SupplierID, CategoryID, UnitPrice, UnitsInStock, Discontinued,
(SELECT Suppliers.CompanyName from Suppliers where Suppliers.SupplierId=Products.ProductId) as SupplierName
FROM Products
WHERE CategoryID=@ CategoryID
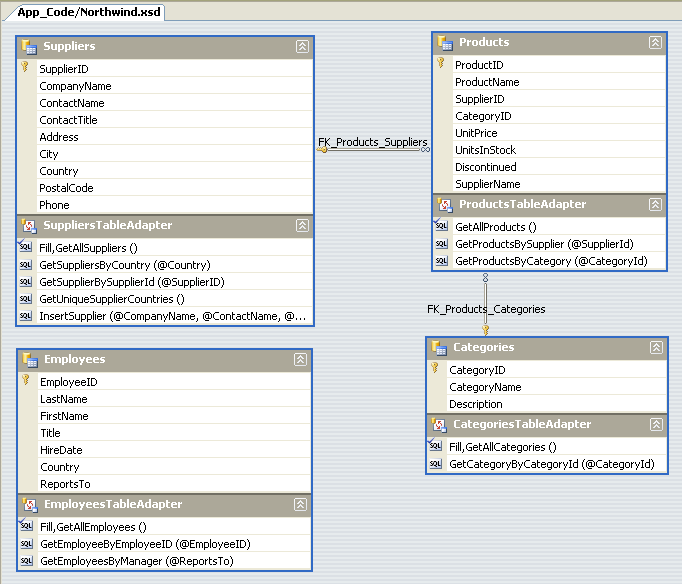
Most of the above TableAdapters are pretty straight-forward and simple. The one that is a little more advanced is the ProductsTableAdapter. Specifically, there in addition to retrieving the Products table columns I’m also retrieving the CompanyName from the Suppliers table that maps to the Product’s SupplierId column (it has a foreign key relationship to the Suppliers table). The above SQL statement will add this as a read-only “SupplierName” column on our ProductsDataTable.
This will allow me to be more efficient from a database perspective when I want to build a list UI on top of my Products table, and save me from having to hit the database an extra time per-row to retrieve this value when displaying a product list on the site.
The good news is that the data designer can still infer enough from the product adapter’s SQL statements to still automatically generate the correct INSERT, UPDATE and DELETE commands for the ProductsTableAdapter. In cases where you are doing more advanced JOINS across multiple tables and merging results from multiple places, the data designer might not be able to generate these automatically. The good news is that you can still define these manually within the designer (just click on the table-adapter, and then within its property grid choose to create a new “Insert” (or update or delete) command and define your own logic).
When finished, my Northwinds data design-surface looks like this (note how the designer will automatically map and detail foreign-key relationships):
When I hit save on the Northwinds.xsd file (where all of the adapters, definitions and relations are declaratively stored in an XML file), I’ll be able to program and data-bind against any of the objects defined within it.
Tutorial 8: Adding Custom Code to the DAL
One of the nice things about the data designer is that the .xsd file that declaratively stores all of the relevant definitions gets translated into either VB or C# code at compile and runtime. This means that you can easily step through it within the debugger, and always understand “what is it doing for me under the covers”.
To easily see what code has been generated by the data designer, just open the “Class View” property window in Visual Web Developer or VS 2005 (if it isn’t visible select the View->Class View menu item), and navigate to the respective namespaces and types to see the object model of them. You can then right-click and choose “Browse Definition” to jump to the generated code for any method:

In addition to viewing the generated code, you can also add to it and extend it in many ways. You can do this either by sub-classing the generated objects, or alternatively by using the new “Partial” keyword feature now supported by the .NET 2.0 language compilers. The partial keyword enables you to add any method, property or events you want to the classes generated within the DAL, and they will be compiled together into a single generated type. Because the partial class code you write lives in a separate file from the files generated by the designer, you do not have to worry about the designer ever clobbering or overwriting your code.
To see a simple example of how you could use this feature, I could easily add an additional “GetProducts()” method to each row of Suppliers within my Northwind DAL (allowing me to easily obtain the ProductDataTable for the specific Supplier I have a reference to). Enabling this is as easy as adding a “SuppliersRow.vb” file in my app_code directory and adding this code to it:
Partial Public Class NorthWind
Partial Public Class SuppliersRow
Public Function GetProducts() As ProductsDataTable
Dim productsAdapter As New NorthwindTableAdapters.ProductsTableAdapterReturn productsAdapter.GetProductsBySupplier(Me.SupplierID)
End Function
End Class
End Class
This tells the VB compiler that I want to add a “GetProducts()” method to the SuppliersRow class (I’m using the “SupplierID” property on the supplier’s row to automatically figure out the subset of products by Supplier – note that I can write “Me.SupplierId” – since this method is part of the SuppliersRow class).
Once I add this I can then write this code to easily hierarchically list each product produced by each Supplier:
Dim suppliersAdapter As New NorthwindTableAdapters.SuppliersTableAdapterDim suppliers As Northwind.SuppliersDataTableDim supplier As Northwind.SuppliersRow
suppliers = suppliersAdapter.GetAllSuppliers()
For Each supplier In suppliers
Response.Write("Supplier: " & supplier.CompanyName & "
")
Dim products As Northwind.ProductsDataTableDim product As Northwind.ProductsRow
products = supplier.GetProducts()
For Each product In productsResponse.Write("------- Product: " & product.ProductName & "
")Next
Next
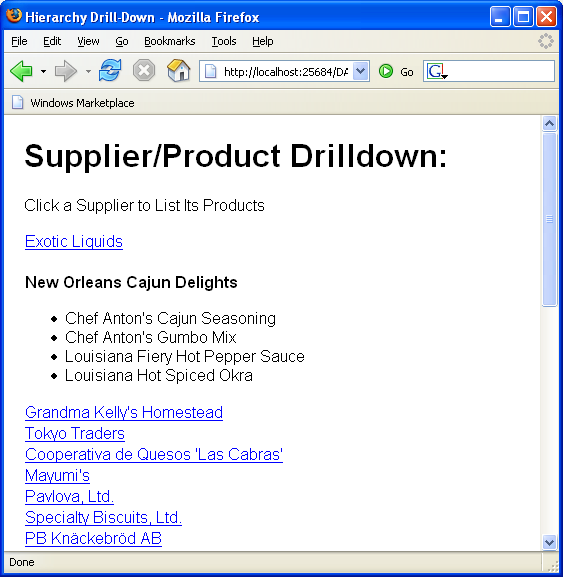
And I could easily build this page using a and control to databind a list of suppliers, and then allow a user to click any of the suppliers to list a hierarchical drill-down of their products:
I’d do this by databinding the suppliers against the DataList:
Hierarchy.aspx.vb:
Protected Sub Page_PreRender(ByVal sender As Object, ByVal e As System.EventArgs) Handles Me.PreRender
Dim suppliersAdapter As New NorthwindTableAdapters.SuppliersTableAdapter
DataList1.DataSource = suppliersAdapter.GetAllSuppliers()DataList1.DataBind()
End Sub
And then using the “Select” feature of DataList to have the selected item template hierarchically retrieve and display the products (this way only the selected supplier’s products are retrieved):
Hierarchy.aspx:
<h1>Supplier/Product Drilldown:h1>
<p>Click a Supplier to List Its Productsp>
<asp:DataList ID="DataList1" runat="server">
<ItemTemplate>
<asp:linkbutton ID="Details" CommandName="Select" runat="server"><%#Eval("CompanyName") %>asp:linkbutton>
ItemTemplate>
<SelectedItemTemplate>
<div class="selectedsupplier">
<strong><%#Eval("CompanyName") %>strong>
<ul>
<asp:Repeater ID="ProductsList" DataSource='<%# Container.DataItem.Row.GetProducts() %>' runat="server">
<ItemTemplate>
<li><%#Eval("ProductName")%>li>
ItemTemplate>
asp:Repeater>
ul>
div>
SelectedItemTemplate>
asp:DataList>
Summary
Hopefully the above set of tutorials provides a useful (and somewhat exhaustive -- sorry for the length) walkthrough of the core features and capabilities you can easily take advantage of with the DataSet designer in Visual Web Developer and VS 2005 to build easy data access layers.
Over the next few weeks I’m going to be posting many (short) blog posting that walkthrough using the DAL I built above to implement common web data patterns using ASP.NET 2.0.

No comments:
Post a Comment