Description
Normally in a MVC3 application we have generally 3 sections.
Model, Controller, View.
Now in a real-world project in our Application there may be many modules.
So separating each of the modules in our MVC3 application is highly recommendable.
In ASP.Net MVC3 we have features called "area" where we can separate into different modules.
For e.g. ADMIN, CUSTOMER, PRODUCT etc.
Now I will show you an example of how to create the "AREA" in MVC3.
Step 1:
Now first create an ASP.Net MVC3 application.
Step 2:
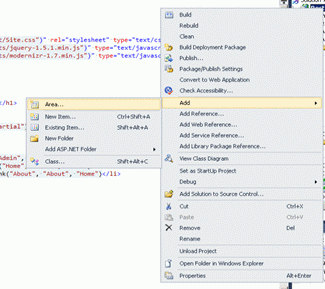
Now right-click the project and "add" a new area with the name "Admin"; that means in our project there are an "admin" module. See the following picture:

Step 3:
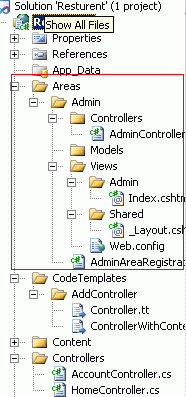
After adding the "admin" area you will see that a separate "Areas" folder will be created. Under this folder controller, model and views, shared folders will be generated.
Now under the "Controller" folder add a new controller named "admin controller".
Now from the "admincontroller" create a new view named "index" from the "index" method.
After that copy the "_layout.cshtml" from the main project and paste it under the "Areas" Shared folder.
Now the whole structure will look like the following once.

Step 4:
Now add a new action link for "Admin" under the _layout.cshtml" like the following picture:

<li>@Html.ActionLink("Admin", "Index", "Admin")li>
So the admin link will be created and when we click the "admin" link it will redirect to the "admin" part of our project which is under the "Areas".
Step 5:
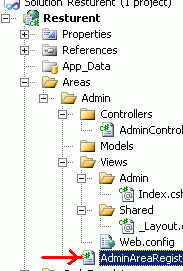
Now go to the "AdminAreaRegistration" file (just the following picture) and modify the existing code like below:

public override void RegisterArea(AreaRegistrationContext context)
{
context.MapRoute(
"Admin_default",
"Admin/{controller}/{action}/{id}",
new { controller = "Admin", action = "Index", id = UrlParameter.Optional }
);
I have added here only Controller Name "Admin"( controller = "Admin") extra under the new {} section.
Now run the application it will look like the following picture:

See here "Admin" link has come.
Now after clicking the admin link it will show like the following picture:

See the url routing. It calls our "Admin " Areas part.
So by this way we can group our project modules into our ASP.Net MVC3 application.
Conclusion
So in this article we have learned what is the purpose of use of "Area" features in ASP.Net MVC3 and how to implement them.
Normally in a MVC3 application we have generally 3 sections.
Model, Controller, View.
Now in a real-world project in our Application there may be many modules.
So separating each of the modules in our MVC3 application is highly recommendable.
In ASP.Net MVC3 we have features called "area" where we can separate into different modules.
For e.g. ADMIN, CUSTOMER, PRODUCT etc.
Now I will show you an example of how to create the "AREA" in MVC3.
Step 1:
Now first create an ASP.Net MVC3 application.
Step 2:
Now right-click the project and "add" a new area with the name "Admin"; that means in our project there are an "admin" module. See the following picture:

Step 3:
After adding the "admin" area you will see that a separate "Areas" folder will be created. Under this folder controller, model and views, shared folders will be generated.
Now under the "Controller" folder add a new controller named "admin controller".
Now from the "admincontroller" create a new view named "index" from the "index" method.
After that copy the "_layout.cshtml" from the main project and paste it under the "Areas" Shared folder.
Now the whole structure will look like the following once.

Step 4:
Now add a new action link for "Admin" under the _layout.cshtml" like the following picture:

<li>@Html.ActionLink("Admin", "Index", "Admin")li>
So the admin link will be created and when we click the "admin" link it will redirect to the "admin" part of our project which is under the "Areas".
Step 5:
Now go to the "AdminAreaRegistration" file (just the following picture) and modify the existing code like below:

public override void RegisterArea(AreaRegistrationContext context)
{
context.MapRoute(
"Admin_default",
"Admin/{controller}/{action}/{id}",
new { controller = "Admin", action = "Index", id = UrlParameter.Optional }
);
I have added here only Controller Name "Admin"( controller = "Admin") extra under the new {} section.
Now run the application it will look like the following picture:

See here "Admin" link has come.
Now after clicking the admin link it will show like the following picture:

See the url routing. It calls our "Admin " Areas part.
So by this way we can group our project modules into our ASP.Net MVC3 application.
Conclusion
So in this article we have learned what is the purpose of use of "Area" features in ASP.Net MVC3 and how to implement them.

No comments:
Post a Comment